18 Jul Add new Joomla Article
With Joomla, easily add an article to your website. The article can be assigned private access and you can also make it a featured article with just a click. Also, publish the article or keep it archived if you want to delay the publishing. Let’s learn how to add new Joomla article.
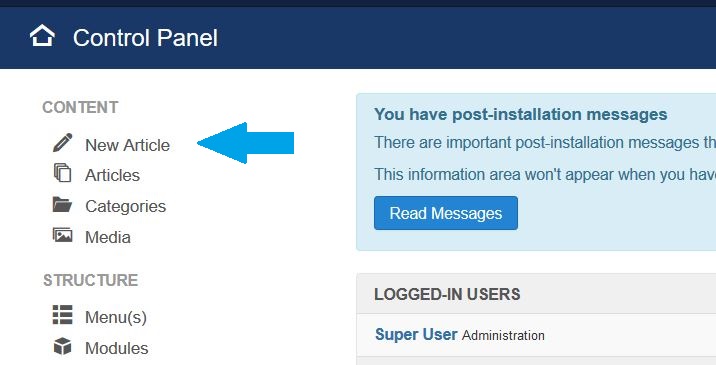
To add new Joomla Article, login to the website as an admin and reach the Joomla Control Panel. From the CONTENT section on the left, click New Article,
Now, you’ll reach the section to add new Joomla article. The following fields are visible, fill the values,
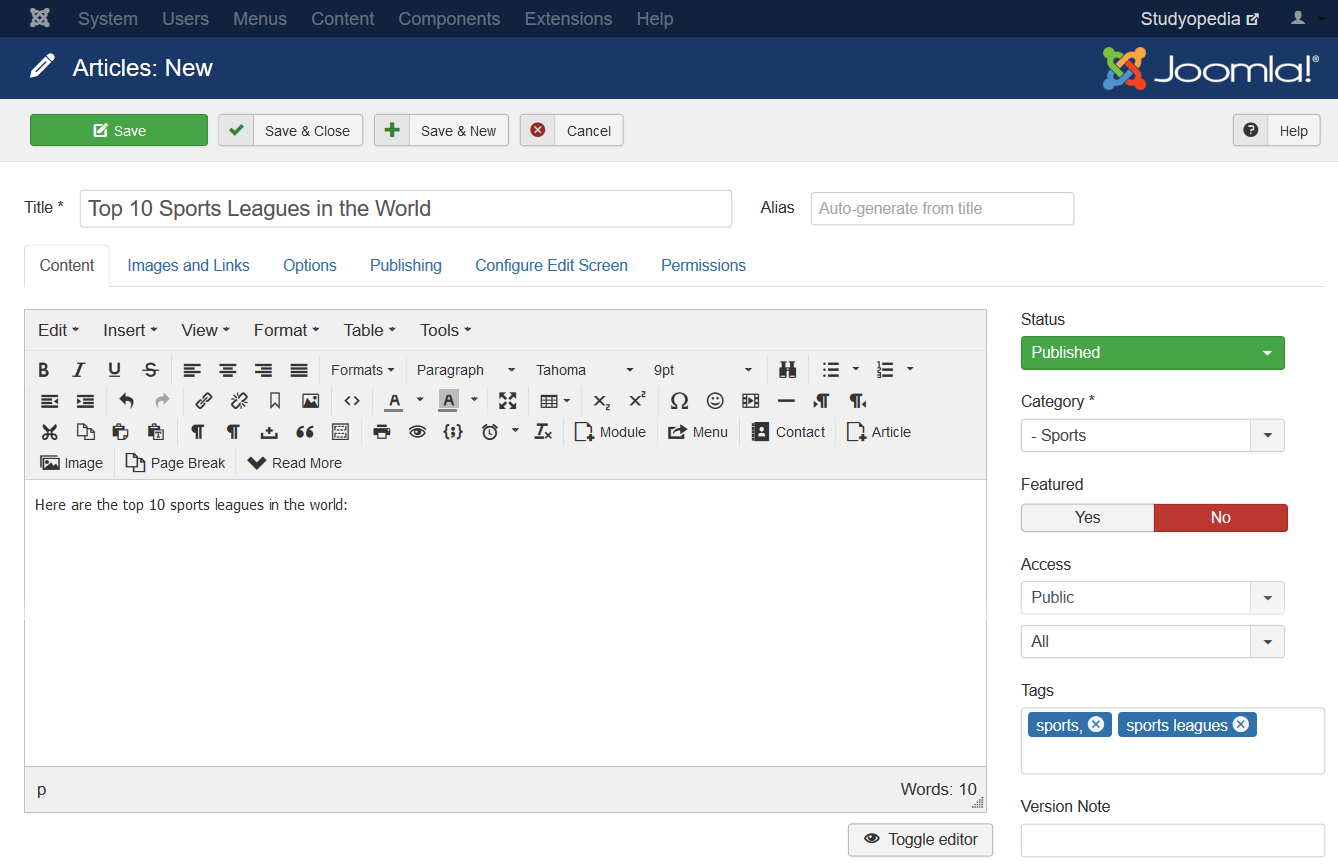
Title: The title of the article. We added, “Here are the Top 10 sports leagues in the world”
Alias: The alias of the article, if left blank, gets auto generated from the title.
Status: Want to keep it Published, Unpublished, Archived or Trashed. We will publish it.
Category: Category of the article. We have selected Sports category
Featured: Want it be a Featured article? We selected, No
Access: We have given it Public access i.e. anyone can read it.
Language: Add the language for the article. We only have a single language i.e. English right now.
Tags: We added tags, sports, sports leagues
Version Note: Add a version note.
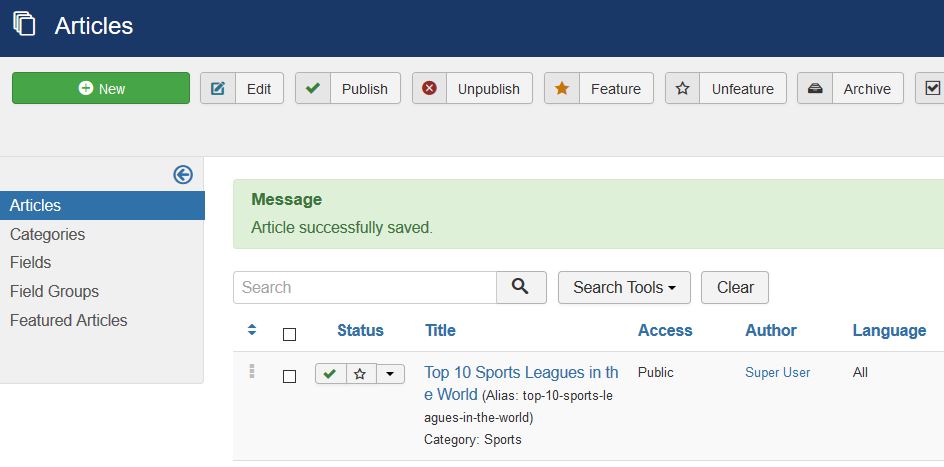
Fill the values above and then click Save & Close in the toolbar. Now, you will reach the article listing section, wherein all the articles are visible as shown below,
Now we will see tabs, which can be seen in the section itself. Here are all the tabs with the fields,
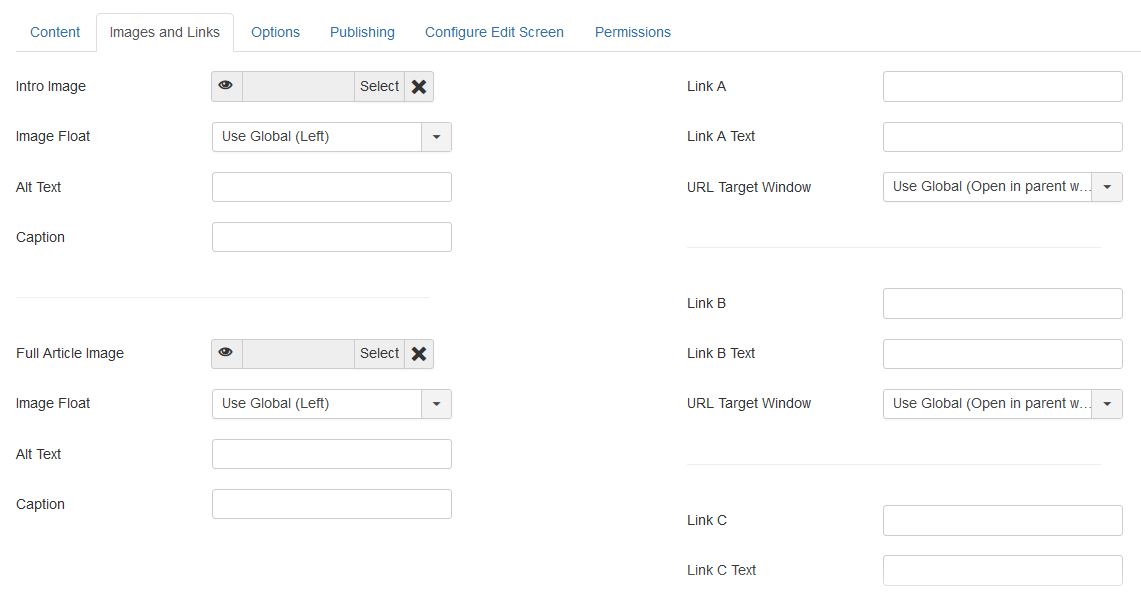
Image and Links Tab
It shows images and links your articles. The field for add new article Images and Links, to add new Joomla article is given below,
Intro Image: On clicking Select, an option will be given to select an image. The image gets displayed in a fixed location in the Intro Text of an article.
Image Float: Float attribute for this image i.e. use Global or Right or Left or None.
Alt Text: The alternative text for this image. Screen reader reads this text and is also visible if the image fails to load.
Caption: Caption for this image.
Full Article Image: On clicking Select, an option will be given to select an image. The image gets displayed in a fixed location in the Full Text of an article.
Image Float: The float attribute for this image i.e. use Global or Right or Left or None.
Alt Text: The alternative text for this image. Screen reader reads this text and is also visible if the image fails to load.
Caption: Caption for this image.
Link A: It is the URL for the first link to be displayed in a fixed location in the article text.
Link A Text: The text for Link A.
URL Target Window: The default value for the target for the first link in the article. Here are the options,
- Open in parent window: Opens the link in the main browser window.
- Open in new window: Opens the link in a new browser window.
- Open in pop up: Opens the link in a pop-up browser window.
- Modal: Opens the link in a modal pop-up window.
Link B: It is the URL for the second link to be displayed in a fixed location in the article text.
Link B Text: The text for Link B.
URL Target Window: default value for the target for the second link in the article.
Link C: It is the URL for the third link to be displayed in a fixed location in the article text.
Link C Text: The text for Link C.
URL Target Window: The default value for the target for the third link in the article.
Options Tab
It shows the article options to control how the article will be visible in the Featured or Category blog layout, when you will add new Joomla article. To add new Joomla article, you need to work on Options tab also,
Layout: Select a layout.
Show Title: Show the Article’s title or hide it, with value, Global or Hide or Show.
Linked Titles: If the title is shown, whether to show it as a link to the article.
Tags: One or more.
Show Intro Text: The Intro Text of the article will show, if set to Show. Use one of the following values: Global, Hide, show.
Position of Article Info: Places the article information block above or below the text. It can also split it into two separate blocks. One block is above and the other is below. Use one of the following values: Global, Use Article Settings, Above, Below, Split.
Article Info Title: Shows the ‘Article Info’ title. Use one of the following values: Global, Hide, show.
Show Category: To show or hide the Article’s Category. Use one of the following values: Global, Hide, show.
Link Category: To show or hide the Article’s Category as a link to a Category layout for that Category. Use one of the following values: Global, No, Yes.
Show Parent: To show or hide the Article’s Parent Category. Use one of the following values: Global, Hide, Show.
Link Parent: Whether to show Article’s Parent Category as a link to a Category layout for that Category. Use one of the following values: Global, No, Yes.
Show Associations. If the associated articles flags or URL Language Code will be displayed, if set to Show.
Show Author: To show or hide the author of the Article. Use one of the following values: Global, Hide, Show.
Link Author: Whether to show Article’s author as a link to a Contact layout for that author. Use one of the following values: Global, No, Yes.
Show Create Date: Show or hide the Article’s creation date. Use one of the following values: Global, Hide, Show.
Show Modify Date: To show or hide the Article’s modify date. Use one of the following values: Global, Hide, Show.
Show Publish Date: Show or hide the Article’s start publishing date. Use one of the following values: Global, Hide, Show.
Show Navigation: To show or hide the navigation link, for example next or previous article. Use one of the following values: Global, Hide, Show.
Show Icons: To Show or Hide icons for Print and Email. Use one of the following values: Global, Hide, Show.
Show Print: Show or Hide the Print Article button. Use one of the following values: Global, Hide, Show.
Show Email: Show or Hide the Email Article button. Use one of the following values: Global, Hide, Show.
Show Voting: Show or Hide the voting icon for the article. Use one of the following values: Global, Hide, Show.
Show Hits: Show or Hide the number of times the article has been hit. Use one of the following values: Global, Hide, Show.
Show Unauthorised Links: If Yes, the Intro Text for restricted articles will be visible. Use one of the following values: Global, Yes, No.
Positioning of the Links: Links are shown above the content for Above value, else shown below the content.
Read More Text: Customize the text that shows for a “read more” link.
Browser Page Title: Here’s the optional text for the “Browser page title” element.
Publishing Tab
To add new Joomla article, you need to also work with the Publishing options. It allows you to show the metadata of the article, which is information not displayed, but is available to Search Engines,
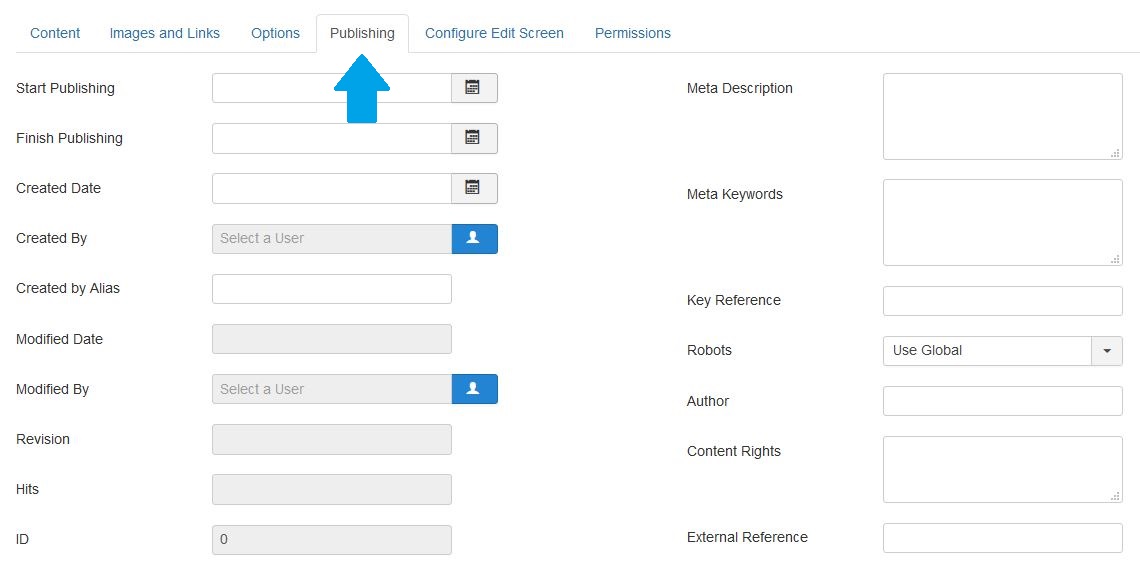
Here are the fields,
Start Publishing: Date and time to start publishing. Schedule here!
Finish Publishing: Date and time to finish publishing.
Created Date: The time when the Article was created.
Created By: The name of the Joomla! User who created the article.
Created By Alias: Enter an alias for this Author for this Article
Modified Date: Date of last modification.
Modified By: User who modified the article.
Revision: Show the number of revisions to the article.
Hits. The number of times an article has been viewed.
ID: A unique identification number for this item. It gets assigned automatically by Joomla
Meta Description: The description of the page in the HTML output. Meta Description gets displayed in the results of search engines.
Meta Keywords: Enter keywords, separated by commas, for example, football, cricket, etc.
Key Reference: Store information referring to an external resource.
Robots: The web “robots” that browse to this page. Index indexes this page and Follow follow the links on the page. Enter any of the following values,
- Use Global: The value set in the Component>Options for this component.
- Index, Follow
- No index, Follow: Do not index the page.
- Index, No follow: Do not follow any links on the page
- No index, no follow: Do not index the page or follow any links on the page.
Author: Creates an HTML meta element with the name attribute of author and the content attribute. This is optional entry.
Content Rights: Mention the rights others have to use this content.
External Reference: To link to external data sources
Configure Edit Screens Tab
Here’s the article options, to add new Joomla article,
Show Publishing Options: If set to No, the back-end users will not be able to edit the following fields: Created by, Created by alias, Created Date, Start Publishing, or Finish Publishing. Use one of the following values: Global, No, Yes.
Show Article Options: If set to No, the Article Options tab in this screen will hide and the back-end users won’t be able to edit the fields in this tab. Use one of the following options: Global, Yes, No
Administrator Images and Links: If Yes, the Images and Links will be visible. Use one of the following values: Global, No, Yes.
Frontend Images and Links: If Yes, the Images and Links fields will show in the Front End article editor screen. Through this users can optionally enter two images and three links. Use one of the following values: Global, No, Yes.
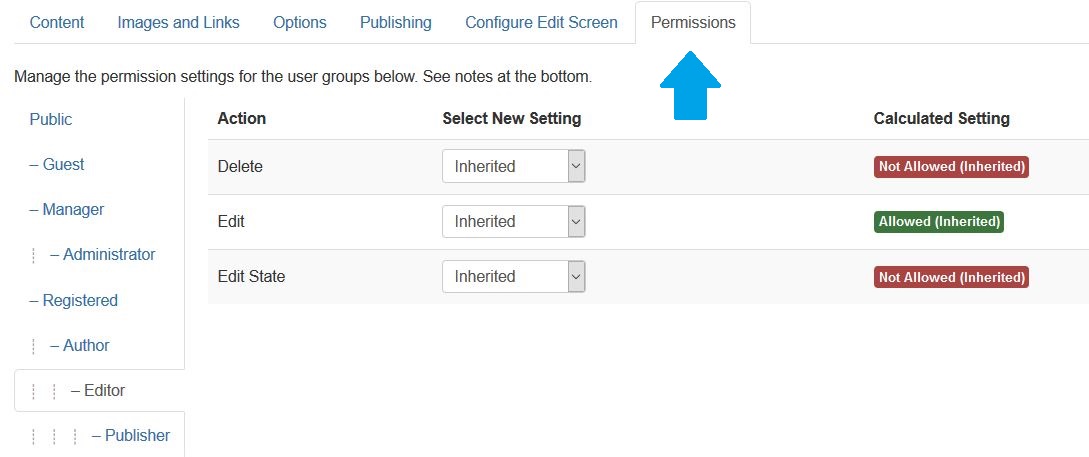
Permissions Tab
To add new Joomla article, you need to work thorught the pptions for Permissions Tab as discussed below,
Select the Users Group i.e. Guest, Manager, Registered, etc from the left as shown in the below figure,
Action: Here are the actions for user: Delete, Edit, and Edit State.
Select New Setting: The desired permission is to be selected here for the action you wish to change.
Here are the settings,
Inherited: Inherited for users from the Global Configuration, Article Manager Options, or Category permissions.
Allowed: Allowed for users in this Group.
Denied: Denied for users.
Toolbar
Here are the functions provided by the Toolbar, to add new Joomla article,
Save: Saves the article.
Save & Close: Saves the article and closes the screen. It gets automatically redirected to article listing screen.
Save & New: Saves the article and opens the screen to create a new article.
Cancel: Closes the screen and returns to the article listing screen i.e. previous screen. Meanwhile it doesn’t save any modifications.
Help: Opens the help screen.
In this lesson, we learned how to add new Joomla article. In the next lesson, we will learn how to delete a Joomla article.
No Comments