
07 Apr Top 100 Android Interview Questions and Answers
Ques 1 – What is Android? What is its latest release?
Android is the World’s most popular Operating System owned by Google for smartphones and tablet. The first beta version of the Android SDK was released by Google in 2007. However, the first commercial version was released in 2008 and the name was given Android 1.0. Let us see some key points:- Android is an Open Source mobile OS for smartphones and tablet. It is used widely on smartphones. Android has Widgets to get information at a glance, you definitely don’t want an application to be click and load. For that, Android comes with Widgets, to display weather, calendar, live news, score updates on the right – home screen.
- Google search with voice-based features came with the initial release of Android. Just “OK Google”. Voice Access feature introduced in 2018 for accessibility i.e. allowing users to control your device with spoken commands.
- Easily move to another task while working on a task in Android. You can run more than one application at once.
- The latest mobile screens have a support with the introduction of Android 9. The DisplayCutout class allow you to get the location and shape of the areas where content shouldn’t be made visible.
- In the recent Android release, you can now display images in Messaging Notifications on phones. For displaying message with images, use the setData() method. It also came with the ImageDecoder class to provide a modernized approach for decoding images.
- Now, you can also work with machine learning on Android. Neural Networks API introduced in Android 8.1 to quicken on-device machine learning on Android. The API enhanced in Android 9.
Ques 2 – What are the core building blocks of Android?
The core building blocks of Android include activities, views, intents, fragments, service, AndroidManifest.xml, etc. Let us see them one by one.- Activity Android program begins with an Activity. It is a single screen, wherein you can place components or widgets.
- View View objects are User Interface elements in Android that responds to the user’s actions. For examples: Button, CheckBox, AutoCompleteTextView, RadioButton, etc.
- Content Providers The Content Provider share data between applications. It is implemented as a subclass of ContentProvider class. The data can be stored in files, database, network, etc.
- Service Service perform long-running operations. It is a background process, therefore the operations run in the background.
- Intent Intent is used in Android to communicate between components. It is a messaging object to pass message between activities, content providers, etc. The startActivity is used with Intent to launch an Activity. The Intents are used for Starting a service, launching an activity, displaying list of contacts, phone calls, connecting another activity, etc.
- AndroidManifest.xml AndroidManifest.xml has key information about the Android app and it is the root of the project source set.
- Android Virtual Device (AVD) The Android Virtual Device (AVD) provides a device specific environment to install and run Android apps. The environment defines the features of Android Tablet, Phone, Android TV, etc. The same is displayed in the Emulator, for example, Google Nexus set as AVD. Simulate the same in the Emulator. The “AVD Manager” is a part of the Android Studio that assists in creating and managing the Android Virtual Devices.
Ques 3 – What are the characteristics of Android?
Android is an OS owned by Google for smartphones and tablet. The first beta version of the Android SDK was released by Google in 2007. However, the first commercial version was released in 2008 and the name was given Android 1.0. The following are the characteristics:- Built-in infrared transmitter Using the built-in infrared transmitter, you can easily use phone or tablet as remote control.
- Widget To get information at a glance, you definitely don’t want an app to be click and load. For that, Android comes with Widgets, to display weather, calendar, live news, score updates on the right – home screen. These widgets are resizable.
- Google search through Voice Google search with voice-based features came with the initial release of Android. Just “OK Google”. Voice Access feature introduced in 2018 for accessibility i.e. allowing users to control your device with spoken commands.
- Multi-tasking Easily move to another task while working on a task. You can run more than one application at once.
- Alternate Keyboards Android supports multiple keyboards. These keyboards you can easily install like SwiftKey. SwiftKey’s artificial intelligence predict the next word the user intends to type.
- Multi-touch gestures A multi-touch gesture features works great in Android. This gesture occurs when multiple finger touch the screen at the same time. Some of the touch events generated by Android are: ACTION_DOWN for the 1st pointer touching the screen, ACTION_UP when the last pointer leaves the screen.
- Storage Android has built-in SQLite database implementation. SQLite is an open-source relational database.
Ques 4. What are the features of Android 10 (Android Q)?
Android 10 is the latest version of Android, released September 3rd, 2019. The following are some of the awesome features introduced with Android 10:- Live Caption to caption videos, podcasts, and audio messages
- Recommended actions with Smart Reply
- Hearing aid support for calls and streaming media with Android 10
- Longer battery life with Android Dark Theme
- More control over privacy for data sharing on your device
- Set screen time limits, view app activity, manage apps and restriction content for kids.
- Faster & regular security updates
- “Emergency Location Services” can send improved location directly from Android devices to emergency services on placing an emergency call.
- On detecting debris or moisture in USB port, the accessories functioning will stop and a notification will be sent to the user for the same.
- 65 new emojis, with emoji like haircut, weightlifting, etc.
- With Android 10, share Wi-Fi details with guests with a QR code and still keep the password secure.
- Sound Amplifier to boost sound, filter background noise, and fine tune
- Smoother and quicker Gestures
- Focus Mode (Beta) would allow you to select apps to pause temporarily.
- Android Auto without using an app with Android 10.
Ques 5 – What are the disadvantages of Android?
Android is an open source mobile Operating System. The first beta version of the Android SDK was released by Google in 2007. However, the first commercial version was released in 2008 and the name was given Android 1.0. The latest release of Android is Android ‘P’ i.e. version 9 The Android OS have some disadvantages: Multiple Applications When multiple applications are open in Android, then the rate of battery consumption is high. Apps on Google Play Store Some apps on the Play Store aren’t compatible with all the functionalities. This may lead to app crashes. A new Android release on your phone may lead to the functionalities of some of the apps to stop working, since these apps were compatible with previous versions. Malware Mobile-specific malware are being designed to attack smartphones and vulnerabilities are emerging. This leads to data safety issues for some users whose mobile get attacked by these Malwares. Fragmentation Not all Android phones and apps adapt to the new version of the OS. This is due to the reason whey Android mobile OS is fragmented.Ques 6 – Why do we use Android Toast?
With Toast in Android, user can display a notification for a short period time. Note: Toast doesn’t block the user’s interaction with the app. Current activity also remains visible. An example would be on click of a button to begin an Android game, a Toast saying “Loading….” Visible below. The difference between a Notification and Toast is that with a Notification you can get a user response for the message. Let us understand it more with the help of an example:Toast.makeText(getApplicationContext(),"Loading…!",Toast.LENGTH_SHORT).show();Or you can also write the above as:
CharSequence msg = "A toast!";
int toast_duration = Toast.LENGTH_SHORT;

val myToast = Toast.makeText(getApplicationContext, msg, toast_duration);
myToast.show();
Above, we have instantiated Toast object with the makeText(ApplicationContext, Toast_Duration, Msg) methods. The Toast method has the following three parameters:
- Application Context: We use getApplicationContext, which returns the context of the single, global Application object of the current process.
- Toast_Duration: Toast.LENGTH_SHORT or Toast.LENGTH_LONG
- Msg: The message to be displayed in the Toast.
- Gravity constant
- x-position offset
- y-position offset
toast.setGravity(Gravity.TOP|Gravity.RIGHT, 0, 0);
Ques 7 – Why do we use Emulator within Android?
If you want to test your application on a device, without physically having it, then use the Emulator. You can select the version on which you want to test your app using it. The following are the benefits: Set Android Versions/ API levels With Emulator, you can see easily the Android version and API levels you want for your Android Virtual Device. This AVD tests your app without the need of a physical device. Simulate Phone calls and Messages With an Emulator, you can easily send phone calls and SMS without needing an Android phone. Connect Emulator from telnet for phone class. Emulate Battery The emulator allows a developer to check the effect of background apps on battery so that an app is developed keeping in mind all these points. Transfer Files Using DDMS in Android Studio, easily transfer files into the emulator for testing purposes. Emulate location With Android Emulator, you can emulate the location as well. Get the Latitude, Longitude, Altitude, etc. for any location without the need of a physical device to test. Emulate Fingerprint Nowadays, fingerprint scanner can be found in Android phone. You can also emulate that using the Emulator.Ques 8 – What is an Activity in Android? What is its lifecycle?
Android program begins with an Activity. It is a single screen, wherein you can place components or widgets. The Android lifecycle begins with the onCreate() method: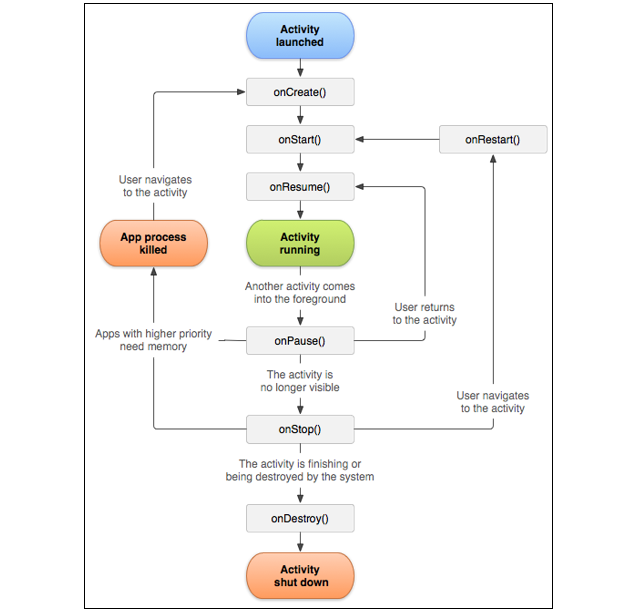
Image Source: developer.android.com
During the Android Activity Life Cycle, the following callback methods are used: onCreate() The callback method onCreate() is called when the activity first gets creates. onStart() The callback method onStart() is called when the activity is visible to the user. onResume() The callback method onResume() is called after onRestoreInstanceState(), onRestart(), or onPause(), so that the activity to begin interacting with the user. onPause() The callback method onPause() is called when an activity is going into the background and is paused. onStop() The callback method onStop() is called when the activity is no longer visible to the user. onRestart() The callback method onRestart() is called when an activity restarts after stopping. onDestroy() The callback method onDestroy() is called before the activity is destroyed.Ques 9 – What is the need of AndroidManifest.xml in Android?
AndroidManifest.xml has key information about the Android app and it is the root of the project source set. The following are the elements of the AndroidManifest.xml file: Package Name The AndroidManifest.xml would definitely have the app’s package name. This is visible at the top:<manifest xmlns:android="http://schemas.android.com/apk/res/android" package="com.studyopedia.exampleapplication">Activities The Manifest file defines all the activities, services, broadcast receivers, etc.
<activity android:name=".MainActivity">
      <intent-filter>
          <action android:name="android.intent.action.MAIN" />

          <category android:name="android.intent.category.LAUNCHER" />
      </intent-filter>
</activity>
It also sets other activities and class files, for example:
<activity android:name=".Numbers_Intro"></activity>
<activity android:name=".NumbersLearn"></activity>
<activity android:name=".NumbersWrite"></activity>

<activity android:name=".Shapes_Intro"></activity>
<activity android:name=".ShapesLearn"></activity>
<activity android:name=".ShapesWrite"></activity>
Permissions The Manifest file also has information about the permissions you may have set to access different features, for example, storage, audio, etc. For example, the permission to set for accessing audio:
<uses-permission android:name="android.permission.RECORD_AUDIO" />Intents The <Intent-Filter> elements are included in the Manifest file to specify the type of intents that an activity, service, or broadcast receiver can respond to. An example:
<activity android:name=".MainActivity">
    <intent-filter>
         <action android:name="android.intent.action.MAIN" />
         <category android:name="android.intent.category.LAUNCHER" />
     </intent-filter>
</activity>
Ques 10 – What is an ADB in Android?
ADB is Android Debug Bridge, which is a command-line tool to communicate with a device. You get access to a UNIX shell with a variety of commands using the ADB command. Installing and debugging apps also comes under ADB. You can also use adb with a device connected over USB. Here are some of the ADB commands:- -a: Listen on all network interfaces instead of only on localhost.
- -d: Direct an adb command to the only attached USB device. Returns an error when more than one USB device is attached.
- -e: Direct an adb command to the only running emulator. Returns an error when more than one emulator is running.
- Help: Display a list of supported adb commands and their descriptions.
- Version: Display the adb version number.
- start-server: Check whether the adb server process is running.
- kill-server: Terminate the adb server process.
- Root: Restart adb with root permissions.
- Unroot: Restart adb without root permissions.
- Client: Client runs on the development machine. Invoke it using the abd command.
- Daemon: It runs as a background process.
- Server: The server manages communication between the client and the daemon.
Ques 11 – What are Fragments in Android?
The concept of Fragments introduced in Android 3.0 (API level 11), for dynamic designs to be implemented primarily on tablets (large screens). You can add more than one fragment in an activity. Create fragments by extending Fragment class. Fragments can also be considered as a “sub activity” that can be reused in different activities. We can add or remove even when the activity is running. A fragment has its own lifecycle. To create a fragment, extend the Fragment. Use the onCreateView() callback method to define the layout. Before fragments, only a single activity was allowed on the screen at a time. This was a limitation for developers since they were unable to customize the screen i.e. dividing the screen to give more flexibility to the sub-parts of the screen. Fragments came to the rescue and now you can easily divide a screen in multiple fragments and control the separately according to the need of the clients. It removed the limitation of having a single activity on the screen at a time.Ques 12 – Fragment Life Cycle in Android?
A subclass of fragment is to be created to create a new Fragment. The callback methods in the activity lifecycle are similar to fragment callbacks. The life cycle of Fragment: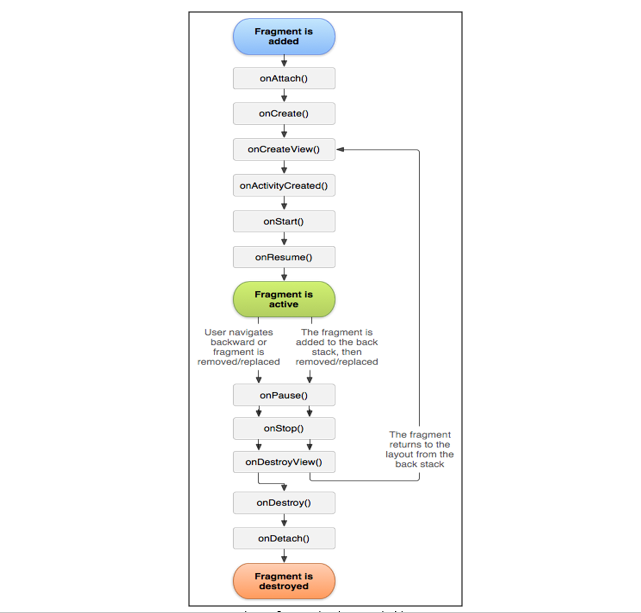
Image Source: developer.android
The following are the lifecycle methods of Fragments:- onAttach(Activity) Called only once when it is attached with activity.
- onCreate(Bundle) Initializes the fragment.
- onCreateView(LayoutInflater, ViewGroup, Bundle) Creates and returns view hierarchy. Null is returned if UI is not provided by the fragment.
- onActivityCreated(Bundle) It is invoked after the completion of onCreate() method. Now, view can be accessed with the findViewById() method.
- onViewStateRestored(Bundle) It provides information to the fragment that all the saved state of fragment view hierarchy has been restored.
- onStart() Called when the fragment is visible.
- onResume() Fragment is active.
- onPause() Called when fragment is no longer interactive i.e. user is leaving the fragment.
- onStop() Called when fragment is no longer visible.
- onDestroyView() Allows the fragment to clean up resources.
- onDestroy() Allows the fragment to do final clean-up of fragment state.
- onDetach() Called immediately prior to the fragment no longer being associated with its activity.
Ques 13 – What are Explicit Intents in Android?
The Explicit Intent allows users to connect one activity to another. It is for an application to launch various internal activities. The following is an example that connects the current activity to next activity Demo.class:Intent i = new Intent(getApplicationContext(),Demo.class);It sets a component via setComponent(ComponentName) or setClass(Context, Class) Let’s see an example: We have an activity “MainActivity.java”. In that, we have a button. On click of button, we will reach reach the next activity i.e. “DemoActivity. Java” using Explicit Intent. For that, you can write the following code in “MainActivity.java”:
public class MainActivity extends AppCompatActivity {

  EditText eText;
  Button btnSubmit;
  String name;

  @Override
  protected void onCreate(Bundle savedInstanceState) {

    super.onCreate(savedInstanceState);
    setContentView(R.layout.activity_main);

    eText = (EditText) findViewById(R.id.editText);
    btn = (Button) findViewById(R.id.button);

    btn.setOnClickListener(new View.OnClickListener() {

        @Override
         public void onClick(View v) {
            Intent ob = new Intent(MainActivity.this,DemoActivity.class);
            startActivity(ob);
         }
     });
   }
}
Ques 14 – Why Implicit Intent used in Android
The Implicit Intent define the action to be performed for different activities. These Intents do not specify a component i.e. the field for component has nothing. The following is an example:Intent i = new Intent(); i.setAction(Intent.ACTION_SEND);Let us see an example of Implicit Intent wherein we will display a web page: activity_main.xml
<?xml version="1.0" encoding="utf-8"?>
<android.support.constraint.ConstraintLayout xmlns:android="http://schemas.android.com/apk/res/android"
    xmlns:app="http://schemas.android.com/apk/res-auto"
    xmlns:tools="http://schemas.android.com/tools"
    android:layout_width="match_parent"
    android:layout_height="match_parent"
    tools:context="demo.com.studyopediaimplicitintent.MainActivity">

    <EditText
        android:id="@+id/editText"
        android:layout_width="wrap_content"
        android:layout_height="wrap_content"
        android:layout_marginEnd="10dp"
        android:layout_marginStart="10dp"
        android:layout_marginTop="65dp"
        android:ems="10"
        app:layout_constraintEnd_toEndOf="parent"
        app:layout_constraintHorizontal_bias="0.575"
        app:layout_constraintStart_toStartOf="parent"
        app:layout_constraintTop_toTopOf="parent" />

    <Button
        android:id="@+id/button"
        android:layout_width="wrap_content"
        android:layout_height="wrap_content"
        android:layout_marginRight="10dp"
        android:layout_marginLeft="150dp"
        android:layout_marginTop="180dp"
        android:text="URL"
        app:layout_constraintEnd_toEndOf="parent"
        app:layout_constraintHorizontal_bias="0.0"
        app:layout_constraintStart_toStartOf="parent"
        app:layout_constraintTop_toBottomOf="@+id/editText" />

</android.support.constraint.ConstraintLayout>
MainActivity.java
package demo.com.studyopediaimplicitintent;

import android.content.Intent;
import android.net.Uri;
import android.support.v7.app.AppCompatActivity;
import android.os.Bundle;
import android.view.View;
import android.widget.Button;
import android.widget.EditText;

public class MainActivity extends AppCompatActivity {

    Button btn;
    EditText editText;

    @Override
    protected void onCreate(Bundle savedInstanceState) {
        super.onCreate(savedInstanceState);
        setContentView(R.layout.activity_main);
        btn = findViewById(R.id.button);
        eText =  findViewById(R.id.editText);

        button.setOnClickListener(new View.OnClickListener() {

            @Override
            public void onClick(View view) {
                String myURL = eText.getText().toString();
                Intent i = new Intent(Intent.ACTION_VIEW, Uri.parse(myURL));
                startActivity(i);
            }
        });
    }
}
On running the above code, you can see an EditText wherein you can add the URL. On clicking the button, the same URL will open.
Ques 15 – What were the features introduced in Android 9 (Pi)?
Following were the features introduced in Android 9: Cutout Support The latest mobile screens have a support with the introduction if Android 9. The DisplayCutout class allow you to get the location and shape of the areas where content shouldn’t be made visible. Images Support With Android 9, you can now display images in Messaging Notifications on phones. For displaying message with images, use the setData() method. Decoding Images Android 9 came with the ImageDecoder class to provide a modernized approach for decoding images. Animation The AnimatedImageDrawable class introduced in Android 9 and allow developers to draw and display GIF and WebP animated images. HDR-enabled Movies Now, Android has built-in support for High Dynamic Range (HDR) VP9 Profile 2. This helps to deliver HDR-enabled movies from YouTube, Play Movies, etc on HDR-capable devices. Support for Machine Learning Neural Networks API introduced in Android 8.1 to quicken on-device machine learning on Android. The API enhanced in Android 9.Ques 16 – What are the Dialog Boxes supported in Android?
If you want to display a small window to the users to take a decision or add information, then use the dialogs in Android. The Dialog class is provided by Android to create a dialog box. The following subclasses of Dialog Box is used: AlertDialog It is a dialog that asks users to take decision between yes or no in response of any particular action taken before. DatePickerDialog Allows user to select date. TimePickerDialog Allows users to select time. Let us see how to create an Alert Dialog. Step1: First create an object:AlertDialog.Builder dialogBuilder = new AlertDialog.Builder(this);Step2: Now set the positive button in the Alert Dialog:
dialogBuilder.setPositiveButton(CharSequence text,

   DialogInterface.OnClickListener listener)
Step3: Now set the negative button in the Alert Dialog:
dialogBuilder.setNegativeButton(CharSequence text,

   DialogInterface.OnClickListener listener)
Step4: Now, use the create() method to create an alert box:
AlertDialog dialog = dialogBuilder.create();
dialog.show();
Ques 17 – What is an AVD?
The Android Virtual Device (AVD) provides a device specific environment to install and run Android apps. The environment defines the features of Android Tablet, Phone, Android TV, etc. The same is displayed in the Emulator, for example, Google Nexus set as AVD. Simulate the same in the Emulator. The “AVD Manager” is a part of the Android Studio that assists in creating and managing the Android Virtual Devices. Follow the below steps to open AVD Manager and create an AVD: Step 1: Open Android Studio, go to Tools > Android > AVD Manager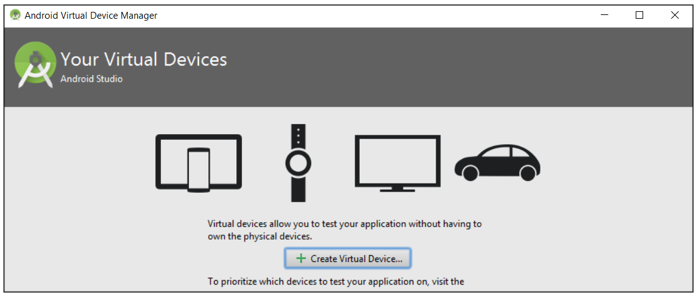 Step 2: Click “Create Virtual Device” as shown above to create a new virtual device.
Step 3: You will reach the “Select Hardware and Device Definitions” section for the AVD. Select the category and the screen size. Click “Next”.
Step 4: Select the “System Image” and Download.
Step 2: Click “Create Virtual Device” as shown above to create a new virtual device.
Step 3: You will reach the “Select Hardware and Device Definitions” section for the AVD. Select the category and the screen size. Click “Next”.
Step 4: Select the “System Image” and Download.
Ques 18 – List some of the Android Studio IDE shortcuts
The keyboard shortcuts are quite useful for any IDE whether it’s Eclipse or Android Studio. Let us see some of the useful keyboard shortcuts that could help developers in using the IDE:| Usage | Shortcut Key on Windows | Shortcut Key on Mac |
|---|---|---|
| Maximize/minimize editor | Control + Shift + F12 | Control + Command + F12 |
| Save ALL | Control + S | Command + S |
| Find | Control + F | Command + F |
| Find next | F3 | Command + G |
| Find previous | Shift + F3 | Command + Shift + G |
| Replace | Control + R | Command + R |
| Go to line | Control + G | Command + L |
| Override methods | Control + O | Control + O |
| Implement methods | Control + I | Control + I |
| Rename | Shift + F6 | Shift + F6 |
| Extract method | Control + Alt + M | Command + Option + M |
| Extract variable | Control + Alt + V | Command + Option + V |
| Extract field | Control + Alt + F | Command + Option + F |
| Extract constant | Control + Alt + C | Command + Option + C |
| Extract parameter | Control + Alt + P | Command + Option + P |
Ques 19 – What is ViewGroup in Android?
The view group is the base class for layouts and views containers. These layouts include the UI Layouts in Android i.e. LinearLayout, RelativeLayout, etc. A ViewGroup is a view under which the layouts and views are set. It defines the ViewGroup.LayoutParams class. The ViewGroup.LayoutParams serves as the base class for layouts parameters. Here are some of the methods of the ViewGroup class beneficial while creating a view:| ViewGroup Method | Description |
|---|---|
| addView(View child) | The method adds a child view |
| addView(View child, int width, int height) | The method a child view with ViewGroup's default layout parameters and the specified width and height. |
| clearChildFocus(View child) | The method is called when a child of this parent is giving up focus |
| clearDisappearingChildren() | The method removes any pending animations for removed views. |
| clearFocus() | When the View lose focus. |
| findFocus() | Find the view in the hierarchy |
| getChildCount() | The method returns the number of children in the group. |
Ques 20 – Role of drawable folder in Android
A Drawable is for the graphic to be drawn on the screen. You can view the Drawable folders in the Android project directory. It is placed in the following folder:res/drawableFollowing are the types of Drawable: Bitmap File Bitmap graphic file includes .png, .jpg, or .gif. Nine-Patch File A PNG file with stretchable regions to allow image resizing based on content i.e. 9.png. Layer List A Drawable that manages an array of other Drawables. These are drawn in array order, so the element with the largest index is be drawn on top. State List References different bitmap graphics for different states, An example can be to use a different image when a button is pressed. It is an XML file. Level List Defines a drawable that manages a number of alternate Drawables, each assigned a maximum numerical value. It is an XML file. Transition Drawable Defines a drawable that can cross-fade between two drawable resources. It is an XML file. Inset Drawable An XML file that defines a drawable that insets another drawable by a specified distance. This is useful when a View needs a background drawable that is smaller than the View’s actual bounds. Clip Drawable A drawable that clips another Drawable based on this Drawable’s current level value. It is an XML file. Scale Drawable A drawable that changes the size of another Drawable based on its current level value. It is an XML file. Shape Drawable Defines a geometric shape, including colors and gradients. It is an XML file.
Ques 21 – View vs ViewGroup in Android
View View objects are User Interface elements in Android that responds to the user’s actions. For examples: Button, CheckBox, AutoCompleteTextView, RadioButton, etc. ViewGroup The view group is the base class for layouts and views containers. These layouts include the UI Layouts in Android i.e. LinearLayout, RelativeLayout, etc. Let us see the differences: The subclass of View is ViewGroup. ViewGroup is an object that holds other View A ViewGroup is a view under which the layouts and views are set. It defines the ViewGroup.LayoutParams class. The ViewGroup.LayoutParams serves as the base class for layouts parameters. An example to state the difference further is that LinearLayout has Button, and other Layouts. LinearLayout is a ViewGroup and Button is a View.Ques 22 – What are the different Layouts in Android?
The following are the layouts in Android:- Linear Layout
- Relative Layout
android:orientation="horizontal"For Vertical (single row):
android:orientation="vertical"The following are some of the useful methods that helps in working with LinearLayout:
- getGravity(): Get the current gravity.
- getOrientation(): Get the current orientation.
- setDividerPadding(int padding): Set padding displayed on both ends of dividers.
- setGravity(int gravity): Describes how the child views are positioned.
- ALIGN_BASELINE: Aligns a child’s baseline with another child’s baseline.
- ALIGN_BOTTOM: Aligns a child’s bottom edge with another child’s bottom edge.
- ALIGN_END: Aligns a child’s end edge with another child’s end edge.
- ALIGN_LEFT: Aligns a child’s left edge with another child’s left edge.
- ALIGN_PARENT_BOTTOM: Aligns the child’s bottom edge with its RelativeLayout parent’s bottom edge.
- ALIGN_PARENT_END: Aligns the child’s end edge with its RelativeLayout parent’s end edge.
- ALIGN_PARENT_LEFT: Aligns the child’s left edge with its RelativeLayout parent’s left edge.
- ALIGN_PARENT_RIGHT: Aligns the child’s right edge with its RelativeLayout parent’s right edge.
- ALIGN_PARENT_START: Aligns the child’s start edge with its RelativeLayout parent’s start edge.
- ALIGN_PARENT_TOP: Aligns the child’s top edge with its RelativeLayout parent’s top edge.
- ALIGN_RIGHT: Aligns a child’s right edge with another child’s right edge.
- ALIGN_START: Aligns a child’s start edge with another child’s start edge.
- ALIGN_TOP: Aligns a child’s top edge with another child’s top edge.
- BELOW: Aligns a child’s top edge with another child’s bottom edge.
- CENTER_HORIZONTAL: Rule that centers the child horizontally with respect to the bounds of its RelativeLayout parent.
- CENTER_IN_PARENT: Rule that centers the child with respect to the bounds of its RelativeLayout parent.
Ques 23 – What are Margins in Android Layout
Margins Margin is outside the View. View here can be a EditText, Button, etc.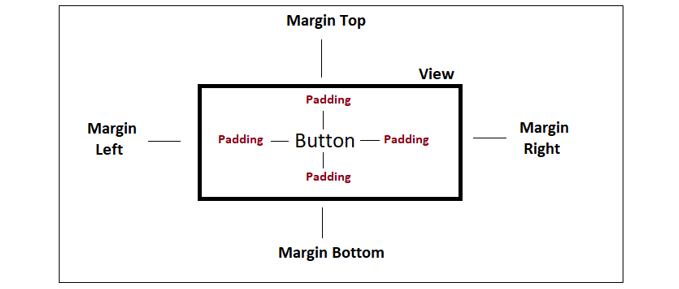 To add right margin i.e. extra space on the right side of the view, use the following attribute:
android:layout_marginEnd = "50dp"To add left margin i.e. extra space on the left side of the view, use the following attribute:
android:layout_marginStart = "50dp"To add top margin i.e. extra space on the top side of the view, use the following attribute:
android:layout_marginTop = “50dp"To add bottom margin i.e. extra space on the bottom side of the view, use the following attribute:
android:layout_marginBottom = “50dp"
Ques 24 – Which Android Layout arranges its children into rows and columns?
The TableLayout allow its children to be arrange into rows and columns. The layout will have a number of TableRow object, each of them defines a row. The following are the attributes of the TableLayout:- android:collapseColumns: The zero-based index of the columns to collapse.
- android:shrinkColumns: The zero-based index of the columns to shrink.
- android:stretchColumns: The zero-based index of the columns to stretch.
<TableLayout xmlns:android="http://schemas.android.com/apk/res/android"
   android:layout_width="fill_parent"
   android:layout_height="fill_parent">

   <TableRow
      android:layout_width="fill_parent"
      android:layout_height="fill_parent">

      <TextView
            ...
                />
      <TextView
            ...
               />

   </TableRow>
   <TableRow>
      <TextView
         ...
                />
      <EditText
         ...
               />
   </TableRow>
   <TableRow
      android:layout_width="fill_parent"
      android:layout_height="fill_parent">

      <Button
         ...
            />

   </TableRow>
</TableLayout>
Ques 25 – Why Android is widely used?
Android is an Open Source mobile OS for smartphones and tablet. It is used widely on smartphones. Android has Widgets to get information at a glance, you definitely don’t want an application to be click and load. For that, Android comes with Widgets, to display weather, calendar, live news, score updates on the right – home screen. Google search with voice-based features came with the initial release of Android. Just “OK Google”. Voice Access feature introduced in 2018 for accessibility i.e. allowing users to control your device with spoken commands. Easily move to another task while working on a task in Android. You can run more than one application at once. The latest mobile screens have a support with the introduction of Android 9. The DisplayCutout class allow you to get the location and shape of the areas where content shouldn’t be made visible. In the recent Android release, you can now display images in Messaging Notifications on phones. For displaying message with images, use the setData() method. It also came with the ImageDecoder class to provide a modernized approach for decoding images. Now, you can also work with machine learning on Android. Neural Networks API introduced in Android 8.1 to quicken on-device machine learning on Android. The API enhanced in Android 9.Ques 26 – Why Gradle is used in Android Studio?
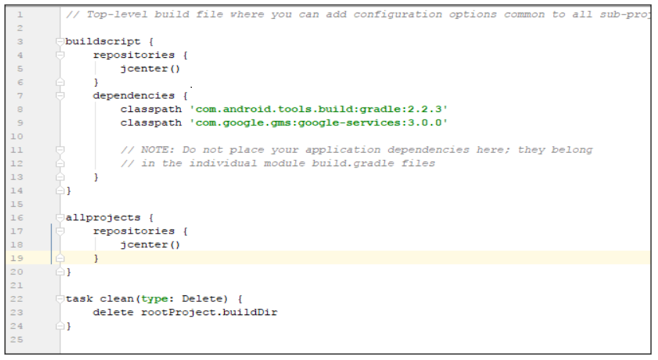
Set custom build configurations in Android with Gradle. To generate an apk, the role of Gradle is quite important. Android Gradle gathers the source files and converts them into a file, which we call apk. The apk is the file which is used to upload an Android app on the Google Play Store. Whenever you create an Android app, on the left, you can see the following “Gradle Scripts” section. Under that you can see two Gradle i.e. Gradle (Project) and Gradle (Module):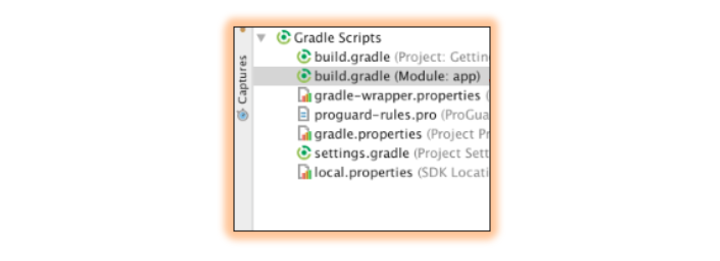 Build Gradle – Project
The build.gradle (project) define the build configuration applies to the modules of the project. As you can see in the below screenshot, it includes:
Build Gradle – Project
The build.gradle (project) define the build configuration applies to the modules of the project. As you can see in the below screenshot, it includes:
- Buildscript: Configure the repositories and dependencies for Gradle.
- Allprojects: configure the third-party plugins or libraries
- Task Clean: Every time a user runs the project, this deletes the directory to get a completely fresh directory.
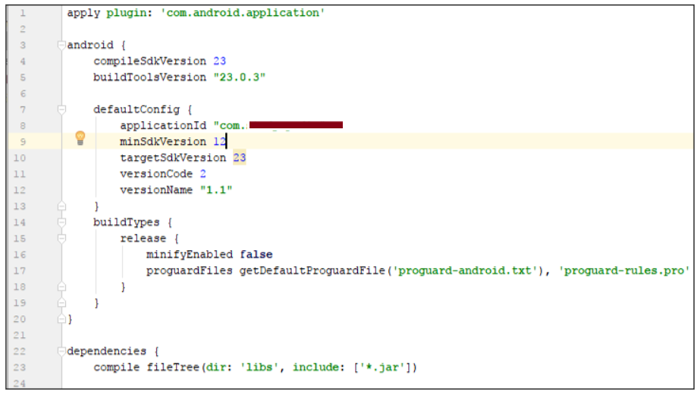
 Build Gradle – Module
In this, the SDK versions are declared. It includes other blocks as well as shown below:
Build Gradle – Module
In this, the SDK versions are declared. It includes other blocks as well as shown below:
- android: Define the API level of the app here.
- defaultConfig: This displays the application id, minim API level to run the app, API level to test the app, etc.
- buildTypes(release): For release
- dependencies: Includes the dependencies to build the project
Ques 27 – When and why Fragments were introduced in Android?
The concept of Fragments introduced in Android 3.0 (API level 11), for dynamic designs to be implemented primarily on tablets (large screens). Before fragments, only a single activity was allowed on the screen at a time. This was a limitation for developers since they were unable to customize the screen i.e. dividing the screen to give more flexibility to the sub-parts of the screen. Fragments came to the rescue and now you can easily divide a screen in multiple fragments and control the separately according to the need of the clients. It removed the limitation of having a single activity on the screen at a time. You can add more than one fragment in an activity. Create fragments by extending Fragment class. Fragments can also be considered as a “sub activity” that can be reused in different activities. We can add or remove even when the activity is running. A fragment has its own lifecycle.Ques 28 – What are XML Parsers in Android?
XML defines a rule for encoding documents. In Android, we can easily parse XML data and use whatever data we want. The following are the types of XML Parsers in Android:- DOM
- SAX, and
- XMLPullParser
Ques 29 – What is a Pending Intent?
PendingIntent is a reference to a token. It is like telling the foreign application to execute some predefined code and act on behalf of the application using the listed permissions of your application. This foreign application include NotificationManager , AlarmManager, Camera, etc. The following are the constants available for PendingIntent:- FLAG_CANCEL_CURRENT: Flag indicating that if the described PendingIntent already exists, the current one should be canceled before generating a new one.
- FLAG_IMMUTABLE: Flag indicating that the created PendingIntent should be immutable.
- FLAG_NO_CREATE: Flag indicating that if the described PendingIntent does not already exist, then simply return null instead of creating it.
- FLAG_ONE_SHOT: Flag indicating that this PendingIntent can be used only once.
- FLAG_UPDATE_CURRENT: Flag indicating that if the described PendingIntent already exists, then keep it but replace its extra data with what is in this new Intent.
Ques 30 – What is Gravity in Android?
Gravity in Android sets how an object is placed in a container. The android:gravity attribute places an object in a large container. The Gravity sets the gravity of the content of the View (Button, EditText, TextView, etc) it’s used on. To place the object property, the following are the constant provided by Android for Gravity:- BOTTOM: Push object to the bottom of its container, not changing its size.
- CENTER: Place the object in the center of its container in both the vertical and horizontal axis, not changing its size.
- CENTER_HORIZONTAL: Place object in the horizontal center of its container, not changing its size.
- CENTER_VERTICAL: Place object in the vertical center of its container, not changing its size.
- CLIP_HORIZONTAL: Flag to clip the edges of the object to its container along the horizontal axis.
- CLIP_VERTICAL: Flag to clip the edges of the object to its container along the vertical axis.
- DISPLAY_CLIP_HORIZONTAL: Special constant to enable clipping to an overall display along the horizontal dimension.
- DISPLAY_CLIP_VERTICAL: Special constant to enable clipping to an overall display along the vertical dimension.
- END: Push object to x-axis position at the end of its container, not changing its size.
- FILL: Grow the horizontal and vertical size of the object if needed so it completely fills its container.
- FILL_HORIZONTAL: Grow the horizontal size of the object if needed so it completely fills its container.
- RIGHT: Push object to the right of its container, not changing its size.
- START: Push object to x-axis position at the start of its container, not changing its size.
- TOP: Push object to the top of its container, not changing its size.
<LinearLayout
         android:layout_width="match_parent"
         android:layout_height="match_parent"
         android:gravity="center_vertical"
         android:orientation="vertical" >
    <EditText
         android:id="@+id/edittext"
         android:layout_width="match_parent"
         android:layout_height="wrap_content"
         android:layout_margin="20dp"
         android:hint="Rank..." >

    <requestFocus />
    </EditText>
</LinearLayout>
Above, we have set the gravity to center_vertical.
Ques 31 – Which class is available in Android to record audio or video?
The MediaRecorder class is used in Android to record audio or video. Before implementing the class to record audio or video, let us see the methods:- setAudioSource(): The source of audio to be recorded.
- setVideoSource(): The source of video to be recorded
- setOutputFormat(): The audio format in which audio to be stored
- setAudioEncoder(): The audio encoder to be used
- setOutputFile(): Configures the path to the file into which the recorded audio is to be stored.
- stop(): Stops the recording process.
- release(): This method should be called when the recorder instance is needed.
MediaRecorder myAudioRecorder = new MediaRecorder();Now, set the audio source:
myAudioRecorder.setAudioSource(MediaRecorder.AudioSource.MIC);The Output Format is to be set:
myAudioRecorder.setOutputFormat(MediaRecorder.OutputFormat.THREE_GPP);The above set output formats can be any of the following based on what user needs:
- AMR_NB: AMR NB file format
- AMR_WB: AMR WB file format
- MPEG_2_TS: H.264/AAC data encapsulated in MPEG2/TS
- MPEG_4: MPEG4 media file format
- THREE_GPP: 3GPP media file format
myAudioRecorder.setAudioEncoder(MediaRecorder.OutputFormat.AMR_NB);
Ques 32 – How to get information of all the networks in Android?
The getAllNetworkInfo() method is used in Android to get information of all the networks. Here’s how you can set it:NetworkInfo[] netList = check.getAllNetworkInfo();
Ques 33 – How to control ringer volume in an Android app?
To control ringer volume in Android app, you can use the AudioManager class. The ringer profile includes the modes silent, vibrate, etc. modes. The AudioManager class allow you to work with these controls. Here are the modes:| Mode | Description |
|---|---|
| RINGER_MODE_VIBRATE | Device at vibrate mode. |
| RINGER_MODE_NORMAL | Device at normal(loud) mode. |
| RINGER_MODE_SILENT | Device at silent mode. |
private AudioManager audioManager; myAudioManager = (AudioManager)getSystemService(Context.AUDIO_SERVICE);Step2: Now, set the ringer profile. For this the setRingerMode() method is used. Here, we have set for “SILENT” mode:
audioManager.setRingerMode(AudioManager.RINGER_MODE_SILENT);For VIBRATE mode:
audioManager.setRingerMode(AudioManager.RINGER_MODE_VIBRATE);For NORMAL mode:
audioManager.setRingerMode(AudioManager.RINGER_MODE_NORMAL);
Ques 34 – What are the key Java-Based libraries for Android App Development?
The following are the libraries available for Android app development:- app − Access to the application model.
- content − Content access, publishing and messaging between applications and application components.
- database − Used to access data published by content providers and includes SQLite database management classes.
- opengl − A Java interface to the OpenGL ES 3D graphics rendering API.
- os − Provides applications with access to standard operating system services including messages, system services and inter-process communication.
- text − Renders and manipulate text on a device display.
- view − Fundamental building blocks of application user interfaces.
- widget − Collection of pre-built user interface components such as buttons, labels, list views, layout managers, radio buttons etc.
- webkit − These are a set of classes intended to allow web-browsing capabilities to be built into applications.
Ques 35 – What are the Application Components of an Android Application?
The following are the application components of an Android Application: Activity Android program begins with an Activity. It is a single screen, wherein you can place components or widgets. View View objects are User Interface elements in Android that responds to the user’s actions. For examples: Button, CheckBox, AutoCompleteTextView, RadioButton, etc. Intent Intent is used in Android to communicate between components. It is a messaging object to pass message between activities, content providers, etc. The startActivity is used with Intent to launch an Activity. The Intents are used for Starting a service, launching an activity, displaying list of contacts, phone calls, connecting another activity, etc. AndroidManifest.xml AndroidManifest.xml has key information about the Android app and it is the root of the project source set. Layouts Layouts sets the appearance of the view. Specify the position of child views relative to each other or parent with Relative Layout. However, the Linear Layout arranges views horizontally or vertically. Content Providers The Content Provider share data between applications. It is implemented as a subclass of ContentProvider class. The data can be stored in files, database, network, etc. Service Service perform long-running operations. It is a background process, therefore the operations run in the background.Ques 36 – What are the tools provided by Android to support Testing?
Within Android, you can test your application. The Test Tools consider that the Android Project is organized into test structure, test classes, test package, etc. Here are some of the tools used to test an Android application: UI/Application Exerciser Monkey The UI/Application Exerciser Monkey is a command-line tool that sends pseudo-random streams of user events. These events can be touch, gesture, etc. It runs of the emulator or device. JUnit The JUnit TestCase class us to be used to perform unit testing on a class. This class shouldn’t call Android APIs. The base class for AndroidTestCase is TestCase, that can be used to test Android-dependent objects. UI Automator Testing Framework For UI Testing, the UI Automator Testing Framework is used. It is used for cross-app functional UI testing. To perform operations on the target device, this test framework is used. UI Automator viewer The uiautomatorviewer tool provides a GUI to scan and analyze the UI components. These components are shown on the Android device and use this tool to view the UI components properties. You can laos inspect the layout hierarchy.Ques 37 – What is the process of drag and drop in Android?
With Android, it’s not a tedious task to drag and drop in a View to another. For example, you can move image from one place to another. Let us understand the drag and drop process: Step1: Begins when a user makes a gesture and starts dragging an item. Application calls the startDrag() method. The data to be dragged is included as a parameter. The system responds by calling back to the application. This gets a drag shadow and the same is displayed on the device. Step2: The drag continues and the system sends ACTION_DRAG_ENTERED action. This is followed by ACTION_DRAG_LOCATION action to the registered drag event listener. Step3: User releases the dragged item at the place of a View where the destination is. System sends the View object’s listener a drag event with action type ACTION_DROP. Step4: System now sends out a drag event with action type ACTION_DRAG_ENDED. This is to specify that the drag operation is over.Ques 38 – How can we launch an existing camera application in the Android app?
To launch an existing camera application i.e. the camera on your Android device, use the MediaStore.ACTION_IMAGE_CAPTURE. This is added under the Intent type:Intent intent = new Intent(android.provider.MediaStore.ACTION_IMAGE_CAPTURE);Now, use a method defined in the Activity class:
startActivityForResult(i,0);The Intents are also available for other applications like launch camera in video mode, or you can set the size limit of video or image capture size:
- ACTION_VIDEO_CAPTURE: Calls the existing video application in android to capture video.
- EXTRA_SCREEN_ORIENTATION: Set the orientation of the screen to vertical or landscape.
- EXTRA_FULL_SCREEN: Control the user interface of the ViewImage.
- INTENT_ACTION_VIDEO_CAMERA: Launch the camera in the video mode.
- EXTRA_SIZE_LIMIT: Specify the size limit of video or image capture size.
Ques 39 – Which API is provided by Android to manage WiFi connectivity?
The WifiManager API allows users to manage WiFi connectivity. Using the API, the following actions can be performed:- Currently Active Wi-Fi network.
- Scan network connections
- Access point scan
- IP Address
- Information about configured networks
- Update the network information
- Check whether Wi-Fi is enabled or disabled.
- Remove a network from the list of specified networks.
button.setOnClickListener(new OnClickListener(){

     public void onClick(View v){

       WifiManager w = (WifiManager) getSystemService(Context.WIFI_SERVICE);
       w.setWifiEnabled(true);
     }
});
Here, button is as shown below with button id as “btn”:
Button button = (Button)findViewById(R.id.btn);As discussed above, the actions that can performed by the WiFiManager API. For this, various constants are provided in Android:
- ACTION_PICK_WIFI_NETWORK: Pick a Wi-Fi network to connect to.
- EXTRA_PREVIOUS_WIFI_STATE: The previous Wi-Fi state.
- WIFI_STATE_DISABLED: Wi-Fi is disabled.
- WIFI_STATE_DISABLING: Wi-Fi is currently being disabled.
- WIFI_STATE_ENABLED: Wi-Fi is enabled.
- WIFI_STATE_ENABLING: Wi-Fi is currently being enabled.
- WIFI_STATE_UNKNOWN: Wi-Fi is in an unknown state.
Ques 40 – How to create a dynamic RadioButton in Android
To create a RadioButton in Android, you can always just drag and drop from the Android Studio ID. But, we can also create a dynamic RadioButton. Let’s say we are creating 4 dynamic Radio Buttons. For that, since we are not using the RadioButton control, take a RelativeLayout: activity_main.xml<?xml version="1.0" encoding="utf-8"?> <RelativeLayout xmlns:android="http://schemas.android.com/apk/res/android" xmlns:tools="http://schemas.android.com/tools" android:layout_width="match_parent" android:layout_height="match_parent" android:paddingBottom="@dimen/activity_vertical_margin" android:paddingLeft="@dimen/activity_horizontal_margin" android:paddingRight="@dimen/activity_horizontal_margin" android:paddingTop="@dimen/activity_vertical_margin" android:id="@+id/relLayout" tools:context="com.studyopedia.example.dynamicradio.MainActivity"> </RelativeLayout>Now, let us consider the java code, wherein we have used Android.view.ViewGroup.LayoutParams and method of RadioButton class: MainActivity.java
package com.studyopedia.example.dynamicradio;

import android.support.v7.app.AppCompatActivity;
import android.os.Bundle;
import android.widget.RadioButton;
import android.widget.RadioGroup;
import android.widget.RelativeLayout;
import android.widget.RelativeLayout.LayoutParams;
import android.widget.Toast;

public class MainActivity extends AppCompatActivity {

    RadioGroup radioGroup;
    RelativeLayout rLayout;
    RadioButton r1,r2,r3,r4;

    @Override
    protected void onCreate(Bundle savedInstanceState) {

        super.onCreate(savedInstanceState);
        setContentView(R.layout.activity_main);

        radioGroup = new RadioGroup(this);
        rLayout = (RelativeLayout) findViewById(R.id.relLayout);

        // 4 radio buttons
        r1 = new RadioButton(this);
        r2 = new RadioButton(this);
        r3 = new RadioButton(this);
        r4 = new RadioButton(this);

        r1.setText("Football");
        r2.setText("Tennis");
        r3.setText("Golf");
        r4.setText("Cricket");

        radioGroup.addView(r1);
        radioGroup.addView(r2);
        radioGroup.addView(r3);
        radioGroup.addView(r4);

        radioGroup.setOrientation(RadioGroup.VERTICAL);

        RelativeLayout.LayoutParams params = new RelativeLayout.LayoutParams((int) LayoutParams.WRAP_CONTENT,(int)LayoutParams.WRAP_CONTENT);

        params.bottomMargin = 200;
        params.leftMargin = 40;

        radioGroup.setLayoutParams(params);
        rLayout.addView(radioGroup);

        radioGroup.setOnCheckedChangeListener(new RadioGroup.OnCheckedChangeListener() {

            @Override
            public void onCheckedChanged(RadioGroup group, int checkedId) {
                RadioButton radioBtn = (RadioButton) findViewById(checkedId);
                Toast.makeText(getApplicationContext(),radioBtn.getText(),Toast.LENGTH_LONG).show();
            }
        });
    }
}
Ques 41 – What are the Storage Methods in Android?
When you will create an Android app, you would definitely need a storage area. You may also want to access data from an external storage i.e. an SD Card. To store data and read it in Android, the following options are available: Internal Storage With Android, you can save and read data from the device’s internal memory. It is the storage of the private data on the device memory. External Storage If you want to read data or save to an external storage, then this is also possible. This external storage can be an SD Card. Android Shared Preferences Store data in key and value pair with Shared Preferences in Android. The data can be retrieved in the same form. SQLite SQLite is an opensource SQL database to store data to a text file on a device. Android has built-in SQLite database implementation.Ques 42 – What is Android Asset Packaging Tool?
Android Asset Packaging Tool is the base builder for Android applications. To compile and package the resources of the app, the Android Studio use it. The resources are compiled and parsed in a binary format. This format is optimized for the Android. Locate AAPT2 To locate Android Asset Packaging Tool in the Android Studio, you need to download Android SDK Build Tools from the command line,sdkmanager "build-tools;build-tools-version"After downloading the Android SDK Build Tools, find the APPT2 at the following location:
android_sdk/build-tools/version/Here are some key points about AAPT:
- AAPT assist in viewing, creating, and updating APKs.
- It even allows you to view, crate and update ZIP-compatible archives i.e. JAR, ZIP, etc.
- Compiles app resources into binary assets.
- AAPT generates the R class. This class has the resource IDs for all the resources. These are under the res/ directory.
Ques 43 – Get information about the connected network in Android?
Use the following state to get information about connected network:NetworkInfo.State.CONNECTED
Ques 44 – When should you use a fragment instead of activity in Android?
The following are the points that would help you in deciding when you should go for Fragments under an activity or only Activity:- A fragment is a part of an activity, which contributes with its own UI to that activity.
- A fragment can be thought of as a sub-activity, whereas the complete screen with which user interacts is called as “activity”.
- An activity has multiple fragments.
- Combine multiple fragments in a single activity to build a multi-pane UI.
- You can add or remove fragments in an activity while the activity is running.
- An activity may contain 0 or multiple number of fragments based on the screen size.
- A fragment is a reusable component in activities.
- You can use a fragment in multiple activities.
- Fragments can be used to populate Menus.
- A fragment should always be part of activity. However, activity can exist without any fragment in it.
- Fragments live inside activities.
- Each activity can host many fragments.
Ques 45 – Can two Android applications share same Linux user ID and share same VM?
Yes, two Android applications can share same Linux user ID and VM. A unique user ID is assigned to each application. Android assigns a unique user ID to each application. Set the same values for both the Android application. In this way they will share the same ID.Ques 46 – How to detect common gestures in Android?
To detect common gestures:- Gather data about touch events.
- Interpret the data to see if it meets the criteria for any of the supported gesture.
Ques 47 – What is Padding in Android?
Padding is within the View. For example, padding is inside a Button control. Padding is or the left, top, right and bottom parts of the view. Here, view can be a Button, TextView, etc. An example here displays a Button View: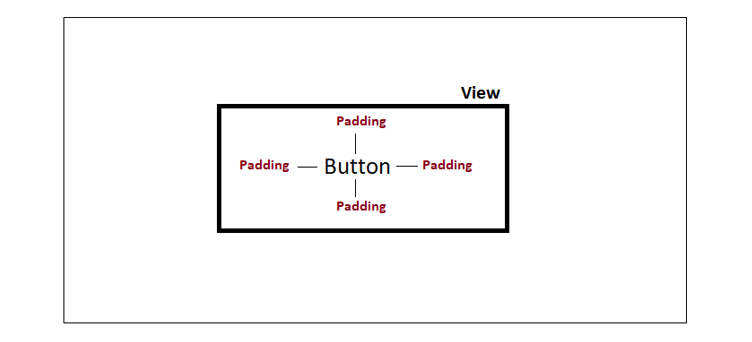 Above, we have a View Button. Here “Button” is our Button text.
To add right padding i.e. the Button will shift to the left within the view, use the following attribute:
Above, we have a View Button. Here “Button” is our Button text.
To add right padding i.e. the Button will shift to the left within the view, use the following attribute:
android:layout_paddingEnd = "50dp"To add left padding i.e. the Button will shift to the right within the view, use the following attribute:
android:layout_paddingStart = "50dp"To add top padding i.e. the Button will shift to the bottom within the view, use the following attribute:
android:layout_paddingTop = "50dp"To add bottom padding i.e. the Button will shift to the top within the view, use the following attribute:
android:layout_paddingBottom = "50dp"
Ques 48 – How to hide Title Bar in Android?
Use the Window class to access the menus, icon on the title bar, enable Action Control, color of the window caption controls, etc. This is also used to hide the Title Bar. To hide the Title Bar, use the following method and set it to “FEATURE_NO_TITLE”:requestWindowFeature(Window.FEATURE_NO_TITLE)This is the constant for the “no title” feature that turns off the title at the top of the screen. After that use the getSupportActionBar() method and hide() method to hide:
getSupportActionBar().hide();Following is the Java code for what we discussed above to hide the Title Bar:
public class MainActivity extends AppCompatActivity {

    @Override
    protected void onCreate(Bundle savedInstanceState) {

        super.onCreate(savedInstanceState);
        requestWindowFeature(Window.FEATURE_NO_TITLE);
        getSupportActionBar().hide();
        setContentView(R.layout.activity_main);
   }
}
Ques 49 – What are the best practices to develop an Android app?
The best practices to be followed while developing an Android app is as follows: Encryption of data The data in the Android app should be encrypted specially when the information is confidential and personal. Test the app Within Android, you can test your application. The Test Tools consider that the Android Project is organized into test structure, test classes, test package, etc. Some tools are UI/Application Exerciser Monkey, Junit, etc. Accessibility Set the description for Controls like tabs, button, sliders, etc. With that, do not forget to set the with background and foreground theme changing/combination options for Accessibility. Usage of strings.xml Place the text in the string resource file i.e. strings.xml. Place launcher icons in mipmap- folders A best practice to follow while developing apps is to place your app icons in mipmap- because they are used at resolutions different from the device’s current density. Avoid including it under the drawable- folders. Deep levels in layouts should be avoided Always try to avoid deep levels in layouts. Depp levels makes it difficult for the interface to work. The simplest way to avoid it is using the correct ViewGroup. You need to prefer single view hierarchy.Ques 50 – What are Android Permission Levels Normal and Dangerous?
For protecting the privacy of Android smartphone and tablet users, a concept called Permissions for Android apps is covered. The apps must request permissions for:- Accessing contacts from the contacts list
- Accessing SMS messages
- Launching Camera
- Internet
- Allowing application to record audio
- Allows applications to connect to paired Bluetooth devices.
- Allows an application to capture video output.
<uses-permission android:name="android.permission.RECORD_AUDIO" />Two types of permissions are listed: Normal Permissions If normal permissions are listed in its manifest, then the system automatically grants those permissions to your app. This is because the permissions aren’t risky to the privacy of users or the operation of the Android device. Here are some of the Normal Permissions:
- ACCESS_LOCATION_EXTRA_COMMANDS: Access information about networks.
- ACCESS_NETWORK_STATE: Access information about networks.
- ACCESS_WIFI_STATE: Access information about Wi-Fi networks.
- BLUETOOTH: Connecting applications to paired Bluetooth devices
- BLUETOOTH_ADMIN: Discover and pair Bluetooth devices.
| Permission Groups | Permissions |
|---|---|
| CALENDAR | READ_CALENDAR and WRITE_CALENDAR |
| CALL_LOG | READ_CALL_LOG, WRITE_CALL_LOG and PROCESS_OUTGOING_CALLS |
| CAMERA | CAMERA |
| CONTACTS | READ_CONTACTS, WRITE_CONTACTS and GET_ACCOUNTS |
| LOCATION | ACCESS_FINE_LOCATION and ACCESS_COARSE_LOCATION |
| MICROPHONE | RECORD_AUDIO |
Ques 51 – How to block out an area on the screen to display a single item in Android?
To achieve this, you need to use the FrameLayout. You can add a single child or multiple child views to FrameLayout and control their position. Let us see how you can create a FrameLayout in activity_main.xml:<FrameLayout xmlns:android="http://schemas.android.com/apk/res/android" android:layout_width="fill_parent" android:layout_height="fill_parent"> <ImageView android:src="@drawable/ic_launcher" android:scaleType="fitCenter" android:layout_height="200px" android:layout_width="200px"/> <TextView android:text="Example" android:textSize="20px" android:layout_height="fill_parent" android:layout_width="fill_parent" android:gravity="center"/> </FrameLayout>The following are the attributes of FrameLayout:
- android:id: This is the ID which uniquely identifies the layout.
- android:foreground: This defines the drawable to draw over the content and possible values may be a color value.
- android:foregroundGravity: Defines the gravity to apply to the foreground drawable. The gravity defaults to fill. Possible values are top, bottom, left, right, center, center_vertical, center_horizontal etc.
- android:measureAllChildren: Determines whether to measure all children or just those in the VISIBLE or INVISIBLE state when measuring. Defaults to false.
Ques 52 – How to create a Content Provider in Android
The Content Provider share data between applications. It is implemented as a subclass of ContentProvider class. The data can be stored in files, database, network, etc. The Content Provider centralize content and allow different applications access it. Let us see how to create a Content Provider:- Create a Content Provider class that extends the Content Provider base class.
- Define content provider URI address to be used to access the content.
- Create a database to store the content.
- You can use the SQLite database. The onCreate() handler of each of its Content Providers is called on the main application thread when the application is launched.
- Implement Content Provider queries for performing different database specific operations.
- Register your Content Provider in the activity file using <provider> tag.
- onCreate(): Called when the provider is started.
- query()This receives a request from a client.
- insert(): To insert a new record into the content provider.
- delete():To delete an existing record from the content provider.
- update():To update an existing record from the content provider.
- getType():Returns the MIME type of the data at the given URI.
Ques 53 – What is ART (Android Runtime) for Android Applications?
Android Runtime (ART) is the managed runtime. It is used by applications on Android. ART and Dalvik were created specifically for the Android project. Dalvik is the predecessor of ART and optimized the virtual machine for memory, battery life and performance. ARM executes the Dalvik Executable format and Dex bytecode specification. The dx tool gets all the class files of your application and generates a single .dex file. It converts the Java class files in .dex files. Dalvik uses a just-in-time (JIT) compiler to compile code when you run an app. However, ART uses an ahead-of-time (AOT) compiler and pre-compiles bytecode when the app is installed. Note: Android removes the aging virtual machine and replaced it with ART in 2014. The following are some of the features of ART: Ahead-of-time (AOT) compilation ART has ahead-of-time (AOT) compilation to enhance app’s performance. At the time of installation, ART compiles apps with the dex2oat tool. Debugging Options ART has a number of debugging options. This includes, locks in stack traces, instances of a given class, references, etc. Detailed Runtime Exception report ART provides with the detailed report for runtime exceptions. The details included are for:- lang.ClassCastException
- lang.ClassNotFoundException
- lang.NullPointerException
- lang.ArrayIndexOutOfBoundsException
- lang.ArrayStoreException
Ques 54 – Why can’t we run standard Java bytecode on Android?
The Java API and virtual machine are designed for desktop, not have that much compatibility with mobile devices. This is why a separate virtual machine is created for mobile devices, called Dalvik virtual machine. The bytecode is translated to Dalvik bytecode. It is optimized for low power handheld devices i.e. mobile devices. In 2014, Dalvik was replaced by ART (Android Runtime). Android runtime (ART) is the managed runtime. It is used by applications on Android. ART and Dalvik were created specifically for the Android project. Dalvik is the predecessor of ART and optimized the virtual machine for memory, battery life and performance. ARM executes the Dalvik Executable format and Dex bytecode specification. The dx tool gets all the class files of your application and generates a single .dex file. It converts the Java class files in .dex files. Dalvik uses a just-in-time (JIT) compiler to compile code when you run an app. However, ART uses an ahead-of-time (AOT) compiler and pre-compiles bytecode when the app is installed.Ques 55 – What is a Widget in Android?
Android has Widgets to get information at a glance, you definitely don’t want an application to be click and load. For that, Android comes with Widgets, to display weather, calendar, live news, score updates on the right – home screen. Users can move and resize the widgets. Let us learn about the types of Widgets in Android: Information Widgets To display information like clock, live score update, weather, etc., use the Information Widgets. To launch, just touch the Widget. Collection Widget Th Collection Widget allow users to create a collection or articles, or collection of images as a Widget. You can scroll these widgets vertically. Control Widget These are functions that can be operated from the home screen like music app, allowing users to play and pause music without operating the actual music app.Ques 56 – How to Speed up Gradle build process in Android Studio?
To speed up Gradle build process in Android Studio, try the below given steps:- Update Gradle versions
- Add incremental true in the Android block
- Optimize build configuration.
- Calculate the build time by disabling antivirus and find out the difference. This is because the antivirus rescan cache files before letting Gradle to use it. The rescanning takes more and would eventually slow down the process.
- Perform profiling to check how long the Gradle takes to execute each phase of the build lifecycle.
Ques 57 – How to pass data between activities in Android?
You can pass data between activities using Android Serializable.Ques 58 – Why do we use Android Parceable?
Parcelable lets developers to serialize a class so its properties are easily transferred from one activity to another. It is the Android implementation of the Java Serializable.Ques 59 – How to access unique IMEI number with Android?
Use TelephonyManager in Android to access unique IMEI number.Ques 60 – What are Pickers in Android?
Pickers is a component in Android that allows users to select date or time. This is possible since Picker has widgets for selecting:- TimePicker Widget: part of the time (hour, minute, AM/PM)
- DatePicker Widget: date (month, day, year).
- getHour(): Returns the currently selected hour using 24-hour time.
- getMinute(): Returns the currently selected minute.
- setEnabled(boolean enabled): Set the enabled state of this view.
- setHour(int hour): Sets the currently selected hour using 24-hour time.
- setIs24HourView(Boolean is24HourView): Sets whether this widget displays time in 24-hour mode or 12-hour mode with an AM/PM picker.
- setMinute(int minute): Sets the currently selected minute.
- validateInput(): Validates whether current input by the user is a valid time based on the locale.
- getFirstDayOfWeek(): Gets the first day of week.
- getMaxDate(): Gets the maximal date supported by this DatePicker in milliseconds since January 1, 1970 00:00:00 in TimeZone.getDefault() time zone.
- getMinDate(): Gets the minimal date supported by this DatePicker in milliseconds since January 1, 1970 00:00:00 in TimeZone.getDefault() time zone.
- setFirstDayOfWeek(int firstDayOfWeek): Sets the first day of week.
- setMaxDate(long maxDate): Sets the maximal date supported by this DatePicker in milliseconds since January 1, 1970 00:00:00 in TimeZone.getDefault() time zone.
Ques 61 – What is a Location Object in Android?
It represents a geographic location that has timestamp, latitude, longitude, etc. To get location specific information with the Location Object, following are the methods:- void setLatitude(double latitude): Set the latitude, in degrees.
- void setLongitude(double longitude): Set the longitude, in degrees.
- float getAccuracy(); Get the estimated accuracy of this location, in meters.
- double getAltitude(); Get the altitude if available, in meters above sea level.
- float getBearing(): Get the bearing, in degrees.
- double getLatitude(): Get the latitude, in degrees.
- double getLongitude(): Get the longitude, in degrees.
- float getSpeed(): Get the speed if it is available, in meters/second over ground.
- boolean hasAccuracy(): True if this location has an accuracy.
- boolean hasAltitude(): True if this location has an altitude.
- boolean hasSpeed(): True if this location has a speed.
- void reset(): Clears the contents of the location.
- void setAccuracy(float accuracy): Set the estimated accuracy of this location, meters.
- void setAltitude(double altitude): Set the altitude, in meters above sea level.
Ques 62 – How to check Internet connection in Android?
To check Internet connection in Android, you need to use the ConnectivityManager class. Here’s the class:ConnectivityManager c = (ConnectivityManager) this.context.getSystemService(Context.CONNECTIVITY_SERVICE);
Ques 63 – What are the Java classes for using sensors in Android?
The following are the classes for using sensors:- Sensor: The capabilities for a specific sensor.
- SensorManager: Registers sensor event listeners.
- SensorEvent: Provides raw sensor data with information for accuracy.
- SensorEventListener: Create two callback methods that receive notifications (sensor events) when sensor values change or when sensor accuracy changes.
Ques 64 – What does Google Map API do in Android?
The Google Map API is used in Android to integrate Google Map in the Android app. You can display any location on the map, show current location, search directions, etc. With the API, you can easily customize the Google Map. On a Map, you may have seen a lot of Markers. On every Marker, you see a text, for example, a restaurant, monument, etc. Let us see how we can add a marker in an Android app. The addMarker() method is used:final LatLng Demo = new LatLng(39 , 77);
Marker m = gMap.addMarker(new MarkerOptions()
.position(Demo).title("MyRestaurant"));
In Android, different types of Maps can be added.
- Hybrid: This display road map with roads, which is Satellite data.
- Satellite: This displays Satellite data that won’t show roads.
- Normal: A basic map with roads, rivers, labels, etc.
- Terrain: Displays colors, contour lines, etc.
gMap.setMapType(GoogleMap.MAP_TYPE_NORMAL);
gMap.setMapType(GoogleMap.MAP_TYPE_TERRAIN);
gMap.setMapType(GoogleMap.MAP_TYPE_HYBRID);
gMap.setMapType(GoogleMap.MAP_TYPE_SATELLITE);
Following are the methods that allow you to customize the Google Map like adding a polygon on the Map, taking snapshot of the app, etc.
- addCircle(CircleOptions options): To add a circle to the map
- addPolygon(PolygonOptions options): To add a polygon to the map
- addTileOverlay(TileOverlayOptions options): To add tile overlay to the map
- animateCamera(CameraUpdate update): To move the map according to the update with an animation
- clear(): To remove everything from the map.
- getMyLocation(): To return the currently displayed user location.
- setTrafficEnabled(boolean enabled): To toggle the traffic layer on or off.
- snapshot(GoogleMap.SnapshotReadyCallback callback): This take a snapshot of the map
Ques 65 – Which database is to be used for Android App Development?
To work with Database on Android, the most widely used Database in SQLite. It is an opensource SQL database to store data to a text file on a device. Android has built-in SQLite database implementation. The package “android.database.sqlite” has a lot of functions that allows you to manage the Android database SQLIte. One of them is “openOrCreateDatabase()”. Here, the database name is DemoDB:SQLiteDatabase db = openOrCreateDatabase("DemoDB",MODE_PRIVATE,null);
To insert a data, you need the execSQL method() method. This works like the Create and Insert in SQL:
Create
db.execSQL("CREATE TABLE IF NOT EXISTS EMPTABLE(empname VARCHAR,empdept VARCHAR, empzone);");
Insert
db.execSQL("INSERT INTO VALUES('Amit','IT', 'North' );");
Now, if you need to get the data from the database, the Cursor class include some methods. Let us learn about these methods can the role they perform in getting the number of rows, columns, array of the column names, etc:
- getColumnCount(): Returns the total number of columns of the table.
- getColumnIndex(String columnName): Returns the index number of a column by specifying the name of the column
- getColumnName(int columnIndex): Returns the name of the column by specifying the index of the column
- getColumnNames(): Returns the array of all the column names of the table.
- getCount(): Returns the total number of rows in the cursor.
- getPosition(): Returns the current position of the cursor in the table.
- isClosed(): Returns true if the cursor is closed and return false otherwise
Ques 66 – What are the types of fragments in Android?
Fragments can also be considered as a “sub activity” that can be reused in different activities. We can add or remove even when the activity is running. A fragment has its own lifecycle. A fragment is a reusable component in activities. You can use a fragment in multiple activities. Fragments can be used to populate Menus. An activity may contain 0 or multiple number of fragments based on the screen size. The following are the types of Fragments:- ListFragment
- DialogFragment
- Single Frame Fragment
Ques 67 – What is the role of Services in Android?
Service perform long-running operations. It is a background process, therefore the operations run in the background. There are two states of Services: A service starts when an activity starts it by calling startService(). After that, a service can run in the background indefinitely. This service runs even when the component that started it is destroyed. A service is bound when an application component binds to it by calling bindService(). A bound service offers a client-server interface allowing components to interact with the service, send requests, etc. Just like an Activity, the Service base class has callback methods:- onStartCommand(): This method is called when another component requests that the service be started calling startService(). After implementing this, you should stop the service by calling stopSelf() or stopService() methods when the work is stopped.
- onBind(): The system calls this method when another component wants to bind with the service by calling bindService(). If you implement this method, you must provide an interface that clients use to communicate with the service, by returning an IBinder object.
- onUnbind(): The system calls this method when all clients have disconnected from a particular interface published by the service.
- onRebind(): The system calls this method when new clients have connected to the service, after it had previously been notified that all had disconnected in its onUnbind(Intent).
- onCreate(): This method is called to perform one-time setup procedures when the service is initially created.
- onDestroy(): This method is called when the service is no longer used and is being destroyed.
Ques 68 – Why do we use Handler in Android?
A Handler in Android allows sending and processing Message and Runnable objects associated with a thread’s MessageQueue. It schedules messages and runnables to be executed in future. A lot of methods are provided for scheduling messages such as postAtTime(Runnable, long), postDelayed(Runnable, Object, long), sendEmptyMessage(int), sendMessage(Message), etc.Ques 69 – How to display a list of completion suggestions automatically while the user is typing?
To display a list of completion suggestions automatically when user types, use the AutoCompleteTextView Control in Android. The following are some of the attributes for AutoCompleteTextView control in Android:- android:completionHint: The hint displayed in the drop down menu.
- android:completionHintView: The hint view displayed in the drop down menu.
- android:completionThreshold: The number of characters that the user must type before completion suggestions are displayed in a drop down menu.
- android:dropDownAnchor: View to anchor the auto-complete dropdown to.
- android:dropDownHeight: The basic height of the dropdown.
- android:dropDownHorizontalOffset: Amount of pixels by which the drop down should be offset horizontally.
- android:dropDownSelector: Selector in a drop down list.
- android:dropDownVerticalOffset: Amount of pixels by which the drop down should be offset vertically.
- android:dropDownWidth: The basic width of the dropdown.
- android:popupBackground: The background to use for the popup window.
- showDropDown(): Displays the drop down on screen.
- setDropDownAnchor(int id): Sets the view to which the auto-complete drop down list should anchor.
- setDropDownBackgroundDrawable(Drawable d): Sets the background of the auto-complete drop-down list.
- setDropDownBackgroundResource(int id): Sets the background of the auto-complete drop-down list.
- setDropDownHeight(int height): Sets the current height for the auto-complete drop down list.
- setDropDownHorizontalOffset(int offset): Sets the horizontal offset used for the auto-complete drop-down list.
- setDropDownVerticalOffset(int offset): Sets the vertical offset used for the auto-complete drop-down list.
- setDropDownWidth(int width): Sets the current width for the auto-complete drop down list.
- getDropDownHeight(): Get the current height for the auto-complete drop down list.
- getDropDownHorizontalOffset(): Get the horizontal offset used for the auto-complete drop-down list.
- getDropDownVerticalOffset(): Get the vertical offset used for the auto-complete drop-down list.
Ques 70 – How to display items in two-dimensional Grids in Android?
Android GridView allows items to be displayed in two-dimensional grid. Let us see how we define a GridView in activity_main.xml:<?xml version="1.0" encoding="utf-8"?> <GridView xmlns:android="http://schemas.android.com/apk/res/android" android:id="@+id/gridview" android:layout_width="fill_parent" android:layout_height="fill_parent" android:columnWidth="80dp" android:numColumns="auto_fit" android:verticalSpacing="8dp" android:horizontalSpacing="8dp" android:stretchMode="columnWidth" android:gravity="center" />The following are the attributes:
- android:id: This is the ID which uniquely identifies the layout.
- android:columnWidth: This specifies the fixed width for each column. This could be in px, dp, sp, in, or mm.
- android:gravity: Specifies the gravity within each cell. Possible values are top, bottom, left, right, center, center_vertical, center_horizontal etc.
- android:horizontalSpacing: Defines the default horizontal spacing between columns. This could be in px, dp, sp, in, or mm.
- android:numColumns: Defines how many columns to show. May be an integer value, such as “100” or auto_fit which means display as many columns as possible to fill the available space.
- android:verticalSpacing: Defines the default vertical spacing between rows. This could be in px, dp, sp, in, or mm.
Ques 71 – What are the sensors supported in Android platform?
The Android platform supports three broad categories of sensors:- Motion sensors: These sensors measure acceleration forces and rotational forces along three axes.
- Environmental sensors: These sensors measure various environmental parameters like humidity, pressure, etc.
- Position sensors: These sensors measure the physical position of a device.
Ques 72 – What are the tips to reduce the battery usage of your Android app caused due to location usage?
Here are some of the tips you can follow to reduce the battery usage of your Android app caused due to location usage:- Remove location updates when they are no longer required.
- For all non-foreground use cases, batch multiple requests together
- Set a timeout when location updates should stop.
Ques 73 – Difference between LinearLayout and RelativeLayout?
The difference can be understood using the following screenshot wherein LinearLayout sets a layout in horizontal or vertical row. However, in RelativeLayout you can set the location of child relative to each other or parent: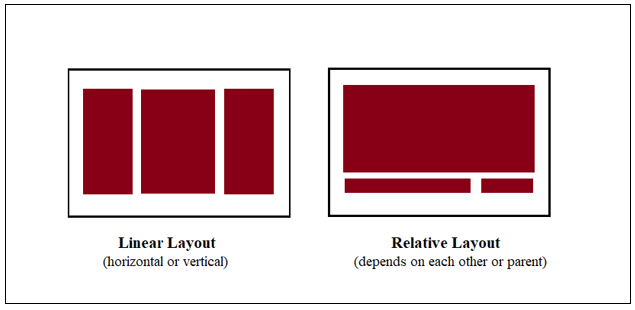 Let us now learn about these layouts to learn about more points about their differences.
The Linear Layout arranges views horizontally or vertically. For this, set the following under linear layout:
For Horizontal (single column):
Let us now learn about these layouts to learn about more points about their differences.
The Linear Layout arranges views horizontally or vertically. For this, set the following under linear layout:
For Horizontal (single column):
android:orientation="horizontal"For Vertical (single row):
android:orientation="vertical"The following are some of the useful methods that helps in working with LinearLayout:
- getGravity(): Get the current gravity.
- getOrientation(): Get the current orientation.
- setDividerPadding(int padding): Set padding displayed on both ends of dividers.
- setGravity(int gravity): Describes how the child views are positioned.
- ALIGN_BASELINE: Aligns a child’s baseline with another child’s baseline.
- ALIGN_BOTTOM: Aligns a child’s bottom edge with another child’s bottom edge.
- ALIGN_END: Aligns a child’s end edge with another child’s end edge.
- ALIGN_LEFT: Aligns a child’s left edge with another child’s left edge.
- ALIGN_PARENT_BOTTOM: Aligns the child’s bottom edge with its RelativeLayout parent’s bottom edge.
- ALIGN_PARENT_END: Aligns the child’s end edge with its RelativeLayout parent’s end edge.
- ALIGN_PARENT_LEFT: Aligns the child’s left edge with its RelativeLayout parent’s left edge.
- ALIGN_PARENT_RIGHT: Aligns the child’s right edge with its RelativeLayout parent’s right edge.
- ALIGN_PARENT_START: Aligns the child’s start edge with its RelativeLayout parent’s start edge.
- ALIGN_PARENT_TOP: Aligns the child’s top edge with its RelativeLayout parent’s top edge.
Ques 74 – How to display web page in an Android application?
If you want to display web pages in your application, then use the WebView. These web pages would be displayed as part of the activity layout. It can handle a wider range of HTML tags for you web pages. It is displayed as: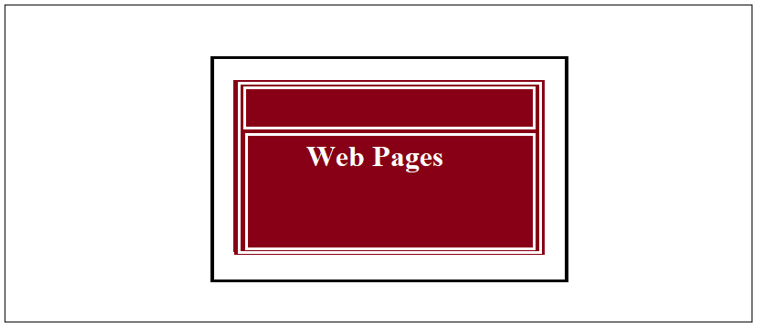 To get control over the WebView and customize it, use the following methods:
- canGoBack(): Specifies the WebView has a back history item.
- canGoForward(): Specifies the WebView has a forward history item.
- clearHistory(): Clears the WebView forward and backward history.
- destroy(): Destroy the internal state of WebView.
- getProgress(): Gets the progress of the current page.
- getTitle(): Returns the title of the current page.
<WebView
        android:id="@+id/webview"
        android:layout_alignParentTop="true"
        android:layout_alignParentLeft="true"
        android:layout_width="match_parent"
        android:layout_height="match_parent"/>
Now, in your Java file, create an object and get the reference:
WebView w = (WebView) findViewById(R.id.webview);Since it’s a WebView and you definitely want to load a URL in it to begin with. For that, the class has the loadUrl(String url) method, in which as “url” you need to set the url:
w.loadUrl("https://www.google.com");
Ques 75 – What are the cloud backup options available for Android app?
Auto backup This auto backup works for Google Drive i.e. your data gets uploaded to the Drive account of the user. You can store up to 25 MB of file-based data per app. It’s enabled by default. Key/Value Backup The Key/Vale Backup saves data in the form of key/value pairs by uploading it to the Android Backup Service.Ques 76 – Why Android introduced nine-patch image in Android?
A nine-patch image is a stretchable bitmap image used as a background of a view. Android supports a variety of different screen sizes because it has nine-patch image. The nine- patch image has an extra 1-pixel border around the image to determine where the image can be stretched. This stretching is to meet the specific layout constraints. The extension of the nine patch images is “.9.png”.Ques 77 – What to use for accessing date in a ContentProvider?
When you want to access data in a ContentProvider, you need to use the ContentResolver object in your application’s Context.Ques 78 – What is DDMS in Android?
DDMS is Dalvik Debug Monitor Server that has many services on the device that includes call spoofing, capturing screenshot, introspection, etc. To run DDMS, click Tools > Android > Android Device Monitor. The left pane allows you to select device. However, the right one gives information about that device or app. The following are the services provided by DDMS:
The main services provided by Dalvik Debug Monitor Server are:
The left pane allows you to select device. However, the right one gives information about that device or app. The following are the services provided by DDMS:
The main services provided by Dalvik Debug Monitor Server are:
- Total heap statistics
- Object allocation statistics
- App thread statistics
- Device screen capture
- Incoming call and SMS spoofing
- Location data spoofing
- Logcat
- Device State Emulation
- Network Statistics Console
Ques 79 – What are Platform Tools in Android?
Google has some tools to control the Android device. Download SDK Platform and SDK Platform-tools to develop an Android app. One of the best know Platform Tools is ADB. ADB is Android Debug Bridge, which is a command-line tool to communicate with a device. You get access to a UNIX shell with a variety of commands using the ADB command. Installing and debugging apps also comes under ADB. You can also use adb with a device connected over USB. The following are the components of ADB:- Client: Client runs on the development machine. Invoke it using the abd command.
- Daemon; It runs as a background process.
- Server; The server manages communication between the client and the daemon.
 Now, when you will type “adb”, then ADB version would be visible. This is how we got ADB on Windows.
The following are some of the commands:
Now, when you will type “adb”, then ADB version would be visible. This is how we got ADB on Windows.
The following are some of the commands:
- adb reboot-bootloader: Reboots Android device in bootloader mode
- adb push: To move a file from your local system to an Android phone’s location.
- adb pull: Moves the file from Android to your System
- adb devices: Displays all the connected adb compatible devices
- adb backup: Backs up the Android device
- adb install: Installs application from your system’s apk file location on to Android device.
- adb reboot: Reboots Android phone in normal mode
Ques 80 – How to create a custom camera interface for your Android app?
Here are the steps to create a custom camera interface for your app:- Check for the existence of camera.
- Create a camera preview class to preview the live images from the camera.
- Create a view layout that incorporates the preview and the user interface controls you want.
- Setup Listeners for Capture like user pressing a button to click an image.
- Capture pictures or videos and save the output.
- After using the camera, your application properly releases it for other applications.
Ques 81 – How to specify location frequency in Android?
To specify location frequency in Android:- Specify the interval at which location is computed for your app.
- Specify the interval at which location computed for other apps is delivered to your app.
Ques 82 – How to define own custom fonts in Android?
The custom fonts can be set for the strings in the Android app. Place the font in the following location:assets/fontsNow, the Typeface class is the class you need to focus on for accessing the same font: Before working on the example, let us first see the methods available to effectively work with fonts:
- create(String familyName, int style): Create a Typeface object given a family name, and option style information.
- create(Typeface family, int style): Create a Typeface object that best matches the specified existing Typeface and the specified Style.
- createFromFile(String path): Create a new Typeface from the specified font file
- defaultFromStyle(int style): Returns one of the default Typeface objects, based on the specified style
- getStyle(): Returns the Typeface’s intrinsic style attributes
<TextView
      android:layout_width="wrap_content"
      android:layout_height="wrap_content"
      android:text="Typeface"
      android:id="@+id/textView1"
      android:layout_alignParentTop="true"
      android:layout_centerHorizontal="true"
      android:textSize="20dp" />
The MainActivity.java file has the following code for Typeface class:
public class MainActivity extends ActionBarActivity {

   TextView tv;

   protected void onCreate(Bundle savedInstanceState) {
      super.onCreate(savedInstanceState);
      setContentView(R.layout.activity_main);

      tv =(TextView)findViewById(R.id.textView1);

      Typeface f = Typeface.createFromAsset(getAssets(), "font/fontnew.ttf");
      tv.setTypeface(f);
   }
}
Ques 83 – How to create custom toast in Android?
Toast is used to display a short message in the bottom that is invisible after some seconds. You can easily create a customized toast in Android. That would mean changing the color of the Toast, background color, different font face and font size. For example, the following is a custom toast: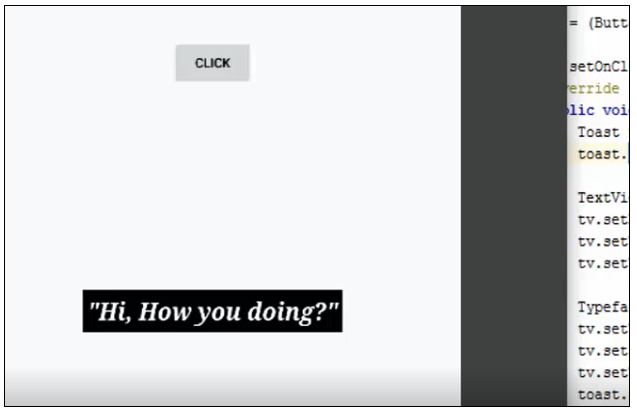 To create a custom toast, you need to set a TextView and work it for setView():
public void onClick(View v) {

  Toast toast = new Toast(getApplicationContext());
  toast.setGravity(Gravity.CENTER,0,0)

  TextView tv = new TextView(MainActivity.this)
  tv.setBackgroundColor(Color.BLACK);
  tv.setTextColor(Color.WHITE)
  tv.setTextSize(25);

  Typeface t = Typeface.create("serif", Typeface.BOLD_ITALIC);
  tv.setTypeface(t);
  tv.setPadding(10, 10, 10, 10);
  tv.setText("\"Hi, How you doing?\"");
  toast.setView(tv);
  toast.show();
  }
}
Above, we have set Toast:
Toast toast = new Toast(getApplicationContext());
toast.setGravity(Gravity.CENTER,0,0)
Now, set the TextView:
TextView tv = new TextView(MainActivity.this)
tv.setBackgroundColor(Color.BLACK);
tv.setTextColor(Color.WHITE)
tv.setTextSize(25);
The Typeface class is used to set the font face:
Typeface t = Typeface.create("serif", Typeface.BOLD_ITALIC);

tv.setTypeface(t);
tv.setPadding(10, 10, 10, 10);
tv.setText("\"Hi, How you doing?\"");
Now pass the TextView object to the Toast:
toast.setView(tv);
Ques 84 – What is Android Interface Definition Language?
The Android Interface Definition Language (AIDL) allows to define the programming interface that both the client and service agree to. This is to form a communication between them using interprocess communication (IPC). AIDL has the following data types:- int
- long
- char
- String
- CharSequence
- List
- Map
- Create an aidl file that defines the programming interface with method signatures.
- Based on the .adl file, an interface is generated by the Android SDK tools. This interface has Stub, which is inner abstract class. This Stub extends Binder.
- Implement a Service and override onBind() to return your implementation of the Stub class.
Ques 85 – What are the touch screen events provided by Android?
Android has some touch screen events like scrolls, pinch, double tap, long presses, etc, which are gestures. GestureDetector class detects various gestures and events. The following methods tell more about how to handle the touch screen events:- getEventTime(): This method gets the event time of the current event being processed.
- getFocusX(): This method gets the X coordinate of the current gesture’s focal point.
- getFocusY(): This method gets the Y coordinate of the current gesture’s focal point.
- getTimeDelta(): This method returns the time difference in milliseconds between the previous accepted scaling event and the current scaling event.
- isInProgress(): This method returns true if a scale gesture is in progress.
- onTouchEvent(MotionEvent event): This method accepts MotionEvents and dispatches events when appropriate.
Ques 86 – Which method is called only once in a fragment life cycle?
The onAttached() method is used only once in a fragment life cycle.Ques 87 – What are the permissions needed to access contacts from an Android device?
To read contact from an Android device, you need the READ_CONTACTS permission. The permissions are set in the AndroidManifest.xml:<uses-permission android:name="android.permission.READ_CONTACTS">
Ques 88 – What are the Events in Android?
Events gathers data about a user’s interaction with interactive components of Applications. The following are the event handlers in Android for click events, pressing a key, selecting a menu item: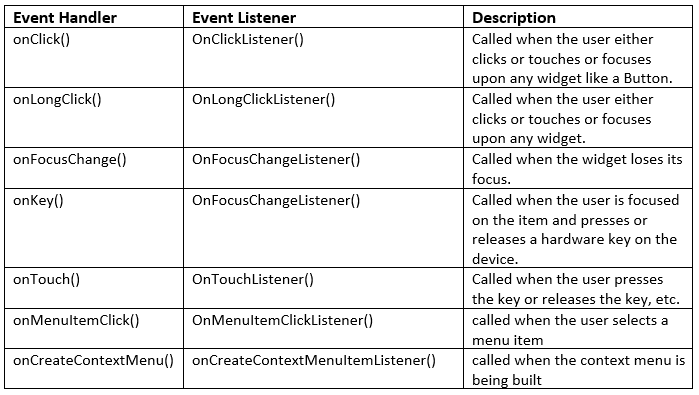
Ques 89 – What are the attributes of Views and ViewGroups in Android?
View objects are User Interface elements in Android that responds to the user’s actions. For examples: Button, CheckBox, AutoCompleteTextView, RadioButton, etc. The ViewGroups is the base class for layouts and views containers. These layouts include the UI Layouts in Android i.e. LinearLayout, RelativeLayout, etc. The following are the attributes:- android:layout_width: Specifies the width of the View or ViewGroup
- android:layout_height: Specifies the height of the View or ViewGroup
- android:android:layout_margin: Specifies extra space on the left, top, right and bottom sides of this view.
- android:layout_marginBottom: Specifies extra space on the bottom side of this view.
- android:layout_marginEnd: Specifies extra space on the end side of this view.
- android:layout_marginHorizontal: Specifies extra space on the left and right sides of this view.
- android:layout_marginLeft: Specifies extra space on the left side of this view.
- android:layout_marginRight: Specifies extra space on the right side of this view.
- android:layout_marginStart: Specifies extra space on the start side of this view.
- android:layout_marginTop: Specifies extra space on the top side of this view.
- android:layout_marginVertical: Specifies extra space on the top and bottom sides of this view.
- android:layout_gravity: Specifies how child Views are positioned
- android:layout_weight: Specifies how much of the extra space in the layout should be allocated to the View.
Ques 90 – From which version the new Android Runtime permission was made necessary and why?
The new Runtime Permission came in Android Marshmallow. It introduced a redesigned application permissions model. The Android apps are no longer automatically granted all of their specified permissions at the time of installation. The users are now prompted to grant or deny individual permissions. For protecting the privacy of Android smartphone and tablet users, a concept called Permissions for Android apps is covered. The apps must request permissions for accessing contacts from the contacts list, accessing SMS messages, launching Camera, Internet, allowing application to record audio, etc. If normal permissions are listed in its manifest, then the system automatically grants those permissions to your app. This is because the permissions aren’t risky to the privacy of users or the operation of the Android device. If dangerous permissions are listed in its manifest, then the user needs to explicitly agree for granting the permissions. This is because the permissions are risky to the privacy of users or the operation of the Android device.Ques 91 – What is the difference between Serializable and Parcelable in Android?
If you want to pass the objects to activities then you need to implement the Serializable or Parcelable interface. Serializable and Parcelable are interfaces. Serializable is a standard java interface and Parcelable is an Android-specific interface. The following are the differences between Serializable and Parceable in Android: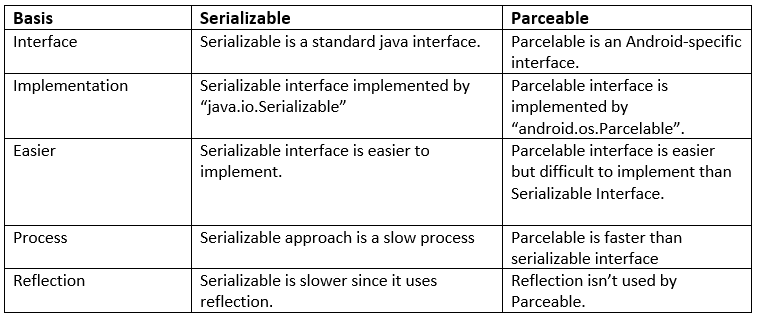
Ques 92 – RecyclerView vs ListView in Android
ListView allows you to add a list of scrollable items. It is a subclass of AdapterView. RecyclerView introduced when Android Marshmallow released to overcome the limitations of ListView. The following are the differences between RecyclerView and ListView in Android: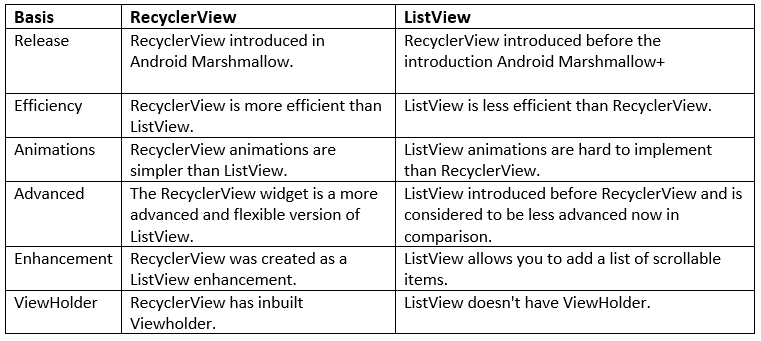
Ques 93 – What is Android Lint. What it is typically used for?
Android Studio has a code scanning tool called lint. This tool allows in knowing and correcting the problems with the structural quality of your code. The following are some of the roles of Android Lint:- Checks the project source files for potential bugs.
- Optimization enhancements.
- Checks the accessibility status of the Android app.
- Finds poorly structured code
- Checks for unused namespaces that takes unnecessary space.
- Code Redundancy
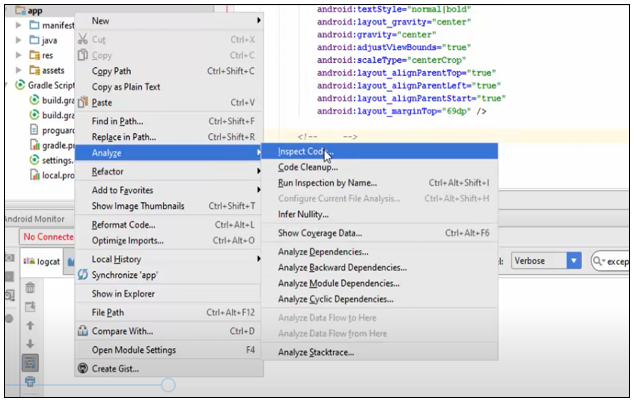 Step3: After clicking, you need to set the “Inspection Scope”. You will get the following options:
Set the scope for:
Step3: After clicking, you need to set the “Inspection Scope”. You will get the following options:
Set the scope for:
- Whole Project: Inspect the entire project.
- Module ‘app’: Inspect only the ‘app’ module.
- Directory: Only the app directory
- Custom Scope: Set the custom scope for scan here.
Ques 94 – What are the files under Android Studio Project Directory?
A Project Directory in Android Studio has a structure that is organized by modules and files. Let’s say we have a project named “DemoProject”. Within that we would have the “src” and “res” directory. The “src” has the following Java files:MainActivity.java DemoActivity.javaThe layouts we have would come under “res/layout”:
main_activity.xml
demo_activity.xml
The “strings.xml” comes under the “res/values/” folder. This is the string resource file. Let us now learn more about it: Manifest AndroidManifest.xml has key information about the Android app and it is the root of the project source set. It consists of the package name, permissions, activity and other information about the app. String Resource The string resource file is the strings.xml file. Set text strings in your application. The location of the strings.xml file is:
res/values/strings.xmlThe src directory The directory has the source and code files. Generate Files (R.java) R.java is the file that generates after compilation. It has the IDs for all the resources of the /res directory. The location of the R.java file is:
\app\build\generated\
Ques 95 – How to change the Android app title?
To change the Android app title, you need to go to the AndroidManifest.xml and change the label. Let’s say the following is the app title right now “AmitApplication”: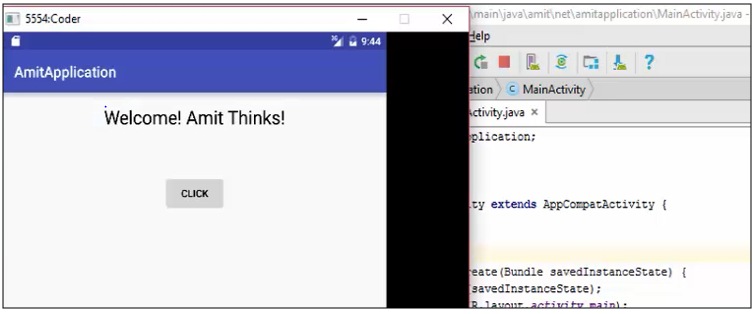 To change the app title, you need to update the <application> tag.
Within the <application> tag, you need to get the label value i.e.:
To change the app title, you need to update the <application> tag.
Within the <application> tag, you need to get the label value i.e.:
android:label="@string/app_name"The app name value is in the strings resource i.e. strings.xml file:
 Now, when you will run the same Android app:
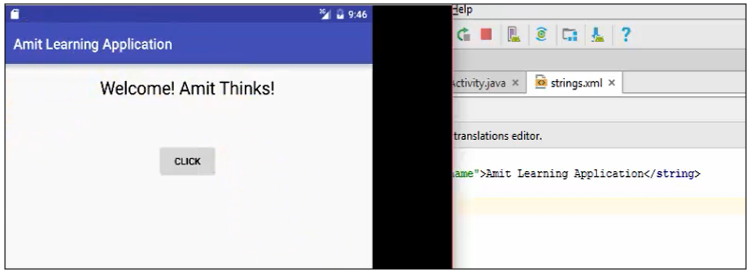 Above, we changed the above title name from “Amit Application” to “Amit Learning Application”
Ques 96. Can we deliver broadcast to other apps with Android Intent?
Yes, we can do that by passing Intent to sendBroadcast(), sendOrderedBroadcast(), or sendStickyBroadcast().Ques 97. What is the APK in Android?
APK is Android Package Kit, which is used for the distribution and installation of mobile apps in Android. It is generally a package file format. The APK file has the entire code, resources, assets, certificates, and manifest file.Ques 98. onCreate() vs onStart() in Android
onCreate() is where the activity gets initialized. It is called only once during the Activity lifecycle. However, the onStart() method is called whenever the Activity becomes visible i.e. it makes the activity visible to the user.Ques 99. How to identify view elements in Android?
The findViewById is used in Android to identify view elements i.e. it is used to retreive and interact with widgets in the UI. Here, id is the id to search for:public T findViewById (int id)
Ques 100 – What is the usage of Intent in Android?
Intent is used in Android to communicate between components. It is a messaging object to pass message between activities, content providers, etc. The startActivity is used with Intent to launch an Activity. The Intents are used for Starting a service, launching an activity, displaying list of contacts, phone calls, connecting another activity, etc. Implicit Intent The Implicit Intent define the action to be performed for different activities. These Intents do not specify a component i.e. the field for component has nothing. The following is an example:Intent i = new Intent(); i.setAction(Intent.ACTION_SEND);Explicit Intent The Explicit Intent allows users to connect one activity to another. It is for an application to launch various internal activities. The following is an example that connects the current activity to next activity Demo.class:
Intent i = new Intent(getApplicationContext(),Demo.class);
For Videos, Join Our YouTube Channel: Join Now
Read More
- ReactJs Interview Questions and Answers
- Java Interview Questions and Answers
- Java Basics Interview Questions and Answers
- Margin in Android Layout
- What is Gradle?
- Android Architecture
- Android Gravity Concepts
- Android Quiz
Molly Bredy
Posted at 00:18h, 15 JulyThank you for the Android Interview QA list with detailed answers.
Great work!