22 Jul Android Project Directory
Android Studio displays directories of an Android project in Android view. The structure is organized by modules and files as shown below. Here’s an example, showing some directories and files of Android Project Directory,
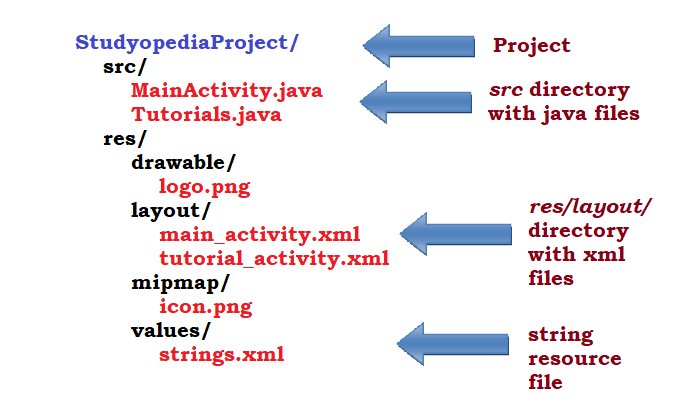
Java (java)
All the java files get stored under java directory.
Location: \app\src\main\java
Resource (res)
This directory consists of all the XML layouts, UI strings, drawable files, etc under sub-directories. The drawable sub-directory is where the images are saved.
Location: \app\src\main\res
Build (build)
It consists of the build output.
Libraries (libs)
It consists of private libraries.
Generated files (R.java)
Android Project Directory files also gets generated when compiled. Here, R.java file onsists of the Java files generated.
R.java consists of IDs for all the resources of the res directory. Do not modify this file, since it generates automatically when the project is compiled.
Location: \app\build\generated\
Assets (assets)
The assets folder consists of files that you want to compile into an .apk file as-is, for example, save font files here.
src (src)
The src directory consists of code and resource files.
Manifests (AndroidManifest.xml)
The AndroidManifest.xml provides important information about your app and is located in the root directory.
It provides a unique identifier to your app in the form of package name.
Sometimes you need to declare permissions so that users can interact with your app. The declaration is done in the AndroidManifest.xml file.
The minimum level of the Android API is also declared in this file. The Android API is what the application requires.
If you have added a new activity, then it should be listed under this file i.e. you need to describe the components of the app here i.e.
<activity android:name=".Tutorials" android:label="Tutorials”></activity>
It describes other components as well, i.e. services, content providers, broadcast receivers, etc.
Strings Resources (strings.xml)
If you want to add text strings for your application, add it in the string resource file. You can also set text styling and formatting.
Location: res/values/strings.xml
Example
Here, you can see how we add string resources in strings.xml file and use it our activity file.
res/values/strings.xml
<?xml version="1.0" encoding="utf-8"?>
<resources>
    <string name="title">Studyopedia Demo App</string>
</resources>
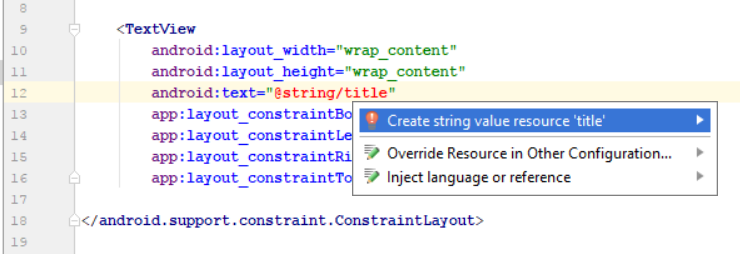
res/layout/activity_main.xml
<TextView
    android:layout_width="fill_parent"
    android:layout_height="wrap_content"
    android:text="@string/title" />
And here’s how we added it,
Under the activity file, we added the text “Studyopedia Demo App” first and then use keys Alt+Enter.
Now, select Create string value resource ‘title’,
Now, the following dialog box opens up, here add the Resource value as Studyopedia Demo App,

Style Resource
Let’s say you want to set style for your buttons, so that you do not need to add styling again and again in your activity file. For that, you need to add a separate style file. This would allow you to combine style resources in one file and reference it whenever you need it.
You can apply style to a View or even to a complete Activity.
Example
res/values/styles.xml
<resources>

  <style name="ImageTitle">
    <item name="android:layout_width">fill_parent</item>
    <item name="android:layout_height">50dp</item>
    <item name="android:layout_alignParentBottom">true</item>
    <item name="android:background">#99000000</item>
    <item name="android:gravity">center</item>
    <item name="android:maxLines">2</item>
    <item name="android:textColor">#fff</item>
    <item name="android:textStyle">bold</item>
    <item name="android:textSize">18dp</item>
    <item name="android:typeface">sans</item>
</style>

</resources>
res/layout/quiz.xml
<TextView
    style="@style/ImageTitle"
    android:text="@string/f1"
    android:layout_width="59dp"
    android:layout_height="40dp"
    android:id="@+id/text1"
    android:layout_alignParentLeft="true"
    android:layout_alignParentStart="true"
    android:layout_toStartOf="@+id/myRadioGroup"
    android:layout_toLeftOf="@+id/myRadioGroup"/>
If you liked the tutorial, spread the word and share the link and our website Studyopedia with others.
For Videos, Join Our YouTube Channel: Join Now
No Comments