21 Nov CSS – Margins
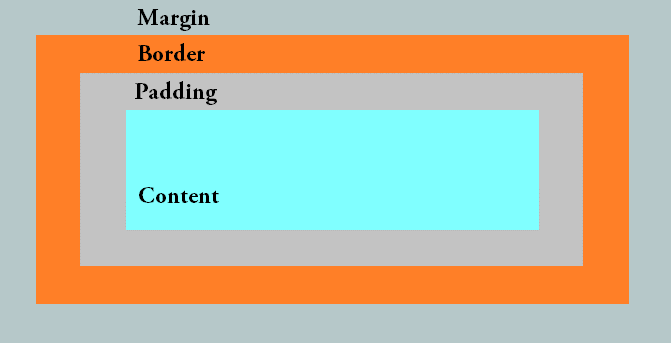
Learn about CSS Margins. A margin defines the space around the content of an element. It has options such as margin-top, margin-bottom, margin-right, and margin-left to set margins for top, bottom, right, and left respectively. The below figure explains wherein margin, padding, and border get placed around a content:
Let us see how to set margins on a web page around content.
CSS margin-top property (Set Top Margin)
To set the top margin of an element on a web page, use the margin-top property. Let us see an example and set the top margin:
<!DOCTYPE html>
<html>
<head>
<style>
p.demo1 {
  margin-top: 60px;
}
p.demo2 {
  margin-top: 40px;
}
</style>
</head>
<body>

<h1>Studyopedia</h1>

<p>This is example text.</p>
<p>This is another example text.</p>
<p class="demo1">This is set as top margin 60 px.</p>
<p class="demo2">This is set as top margin 40 px.</p>

</body>
</html>
Output

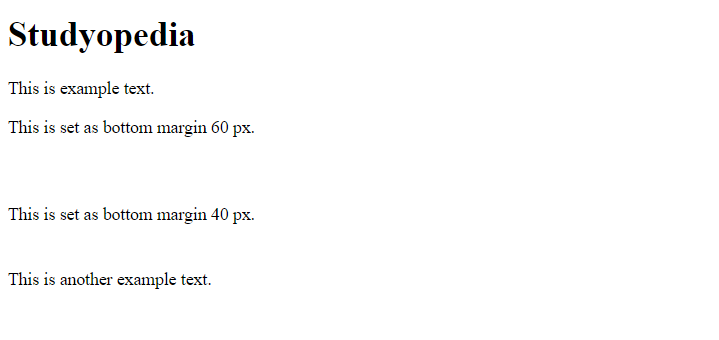
CSS margin-bottom property (Set Bottom Margin)
To set the bottom margin of an element on a web page, use the margin-bottom property. Let us see an example and set the bottom margin:
<!DOCTYPE html>
<html>
<head>
<style>
p.demo1 {
  margin-bottom: 60px;
}
p.demo2 {
  margin-bottom: 40px;
}
</style>
</head>
<body>

<h1>Studyopedia</h1>

<p>This is example text.</p>
<p class="demo1">This is set as bottom margin 60 px.</p>
<p class="demo2">This is set as bottom margin 40 px.</p>
<p>This is another example text.</p>

</body>
</html>
Output
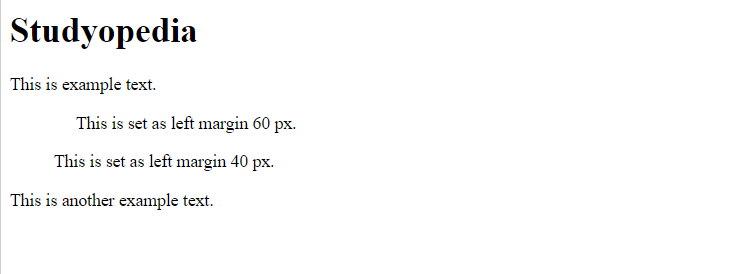
CSS margin-left property (Set Left Margin)
To set the left margin of an element on a web page, use the margin-left property. Let us see an example and set the left margin:
<!DOCTYPE html>
<html>
<head>
<style>
p.demo1 {
  margin-left: 60px;
}
p.demo2 {
  margin-left: 40px;
}
</style>
</head>
<body>

<h1>Studyopedia</h1>

<p>This is example text.</p>
<p class="demo1">This is set as left margin 60 px.</p>
<p class="demo2">This is set as left margin 40 px.</p>
<p>This is another example text.</p>

</body>
</html>
Output
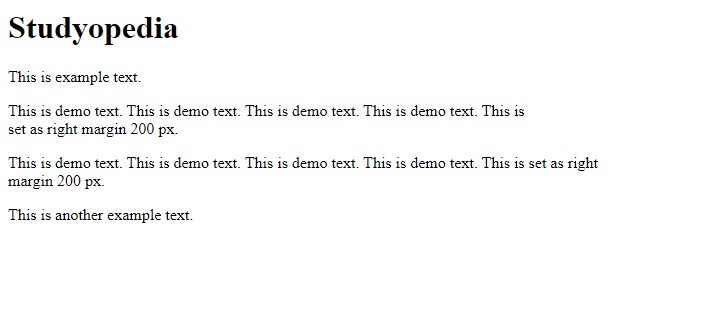
CSS margin-right property (Set Right Margin)
To set the right margin of an element on a web page, use the margin-right property. Let us see an example and set the right margin:
<!DOCTYPE html>
<html>
<head>
<style>
p.demo1 {
  margin-right: 200px;
}
p.demo2 {
  margin-right: 90px;
}
</style>
</head>
<body>

<h1>Studyopedia</h1>

<p>This is example text.</p>
<p class="demo1">This is demo text. This is demo text. This is demo text. This is demo text. This is set as right margin 200 px. </p>
<p class="demo2">This is demo text. This is demo text. This is demo text. This is demo text. This is set as right margin 200 px.</p>
<p>This is another example text.</p>

</body>
</html>
Output
CSS Margins Shorthand Property
In CSS, you can easily set all the margins in a single line using the margins property itself. It allows you to set:
- Top Margin
- Bottom Margin
- Left Margin
- Right Margin
Let us see an example to set margins:
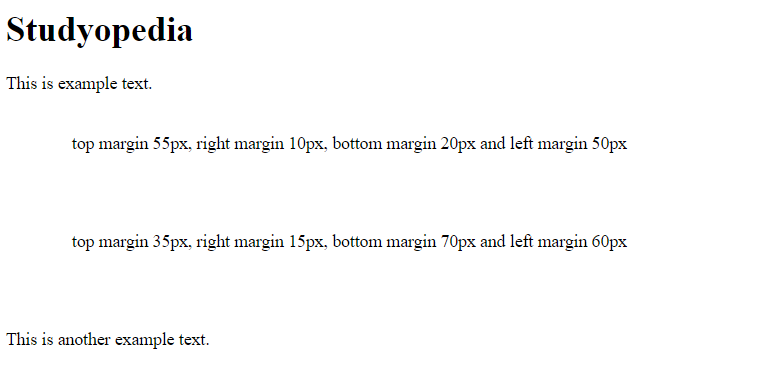
<!DOCTYPE html>
<html>
<head>
<style>
p.demo1 {
  margin: 55px 10px 20px 50px;
}
p.demo2 {
  margin: 35px 15px 70px 60px;
}
</style>
</head>
<body>

<h1>Studyopedia</h1>

<p>This is example text.</p>
<p class="demo2">top margin 55px,right margin 10px, bottom margin 20px and left margin 50px</p>
<p class="demo2">top margin 35px,right margin 15px, bottom margin 70px and left margin 60px</p>
<p>This is another example text.</p>

</body>
</html>
Output
If you liked the tutorial, spread the word and share the link and our website Studyopedia with others.
Read More:
No Comments