03 Mar Question Answering using Hugging Face
In this lesson, we will learn how to use the Hugging Face Transformers library for Question-Answering. Learn how to use the Hugging Face Transformers library for Question-Answering. We will see the steps with examples. Using a Hugging Face model for question answering (QA) is quite easy with the Transformers library.
Before moving further, we’ve prepared a video tutorial to implement Question-Answering with Hugging Face:
Note: We will run the codes on Google Colab
Questions Answering – Coding Example
Below is a step-by-step guide to using a pre-trained QA model from Hugging Face.
Step 1: Install the Required Libraries
Make sure you have the transformers and torch (or tensorflow) libraries installed. On Google Colab, use the following command to install:
|
1 2 3 |
!pip install transformers torch |
Step 2: Load a Pre-trained QA Model
Hugging Face provides several pre-trained models for question answering, such as bert-large-uncased-whole-word-masking-finetuned-squad or distilbert-base-cased-distilled-squad. You can load a model and its tokenizer as follows:
|
1 2 3 4 5 6 |
from transformers import pipeline # Load a pre-trained QA pipeline qa_pipeline = pipeline("question-answering") |
Alternatively, you can load a specific model and tokenizer:
|
1 2 3 4 5 6 7 |
from transformers import AutoModelForQuestionAnswering, AutoTokenizer model_name = "bert-large-uncased-whole-word-masking-finetuned-squad" tokenizer = AutoTokenizer.from_pretrained(model_name) model = AutoModelForQuestionAnswering.from_pretrained(model_name) |
Step 3: Prepare the Input
For QA tasks, you need:
- A context (a paragraph or text where the answer might be found).
- A question (the question you want to answer).
Example:
|
1 2 3 4 5 6 7 8 9 10 |
context = """ I am Amit Diwan from Delhi. My interests include programming and cricket. I have created courses not only in programming, but web dev, and database technologies as well. Yes, AI is trending, and we all are a part of it. Artificial Intelligence (AI) is transforming the world by enabling machines to learn, adapt, and perform tasks that typically require human intelligence. """ question = "Where Amit Diwan is based?" |
Step 4: Tokenize the Input
Tokenize the context and question using the tokenizer:
|
1 2 3 |
inputs = tokenizer(question, context, return_tensors="pt") |
Step 5: Get the Model’s Prediction
Pass the tokenized input to the model to get the answer:
|
1 2 3 4 5 6 7 8 9 10 11 12 13 14 15 16 17 |
outputs = model(**inputs) # Extract the start and end scores start_scores = outputs.start_logits end_scores = outputs.end_logits # Get the most likely start and end positions start_index = start_scores.argmax() end_index = end_scores.argmax() # Convert token IDs back to words answer_tokens = inputs["input_ids"][0][start_index : end_index + 1] answer = tokenizer.decode(answer_tokens, skip_special_tokens=True) print(f"Answer: {answer}") |
For the example above, the output might look like:
|
1 2 3 |
Answer: delhi |
or
Alternative code: Use the Pipeline (Simpler Alternative)
If you don’t want to handle tokenization and model outputs manually, you can use the pipeline API, which simplifies the process:
|
1 2 3 4 5 6 7 8 9 |
from transformers import pipeline qa_pipeline = pipeline("question-answering") result = qa_pipeline(question=question, context=context) print(f"Answer: {result['answer']}") print(f"Score: {result['score']}") |
For the alternative example above, the output might look like:
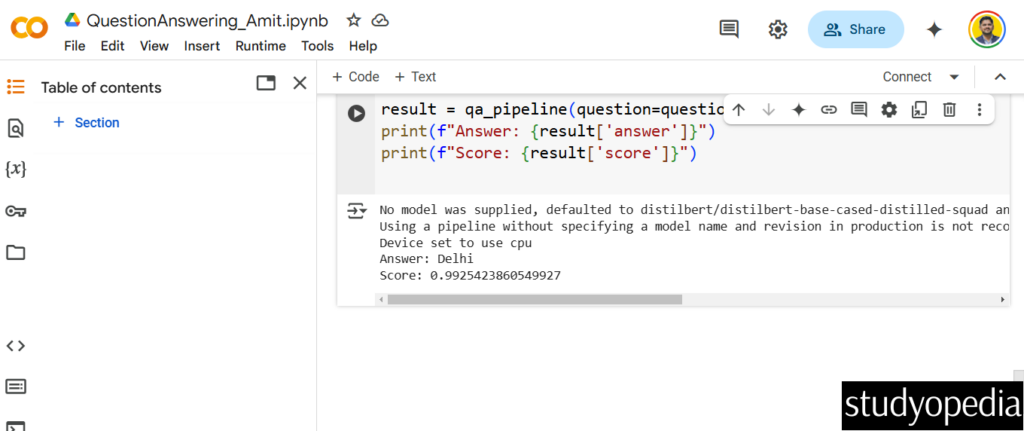
The above screenshot displayed the following output:
|
1 2 3 4 |
Answer: Delhi Score: 0.9925423860549927 |
If you liked the tutorial, spread the word and share the link and our website Studyopedia with others.
For Videos, Join Our YouTube Channel: Join Now
Read More:
- RAG Tutorial
- Generative AI Tutorial
- Machine Learning Tutorial
- Deep Learning Tutorial
- Ollama Tutorial
- Retrieval Augmented Generation (RAG) Tutorial
- Copilot Tutorial
- ChatGPT Tutorial
No Comments