22 May Coding Example of Retrieval Augmented Generation (RAG)
In this lesson, we will see a coding example of RAG and upload our document. We will summarize the same document using RAG. The code will be implemented on Google Colab.
Complete RAG System with PDF upload
Let us see the code to implement on Google Colab:
1. Setup & Installation
First, install required packages:
!pip install -q pypdf PyMuPDF sentence-transformers faiss-cpu transformers
pypdf/PyMuPDF: PDF text extractionsentence-transformers: For creating embeddingsfaiss-cpu: Efficient similarity search (CPU version)transformers: For question answering
2. Uploading Your PDF
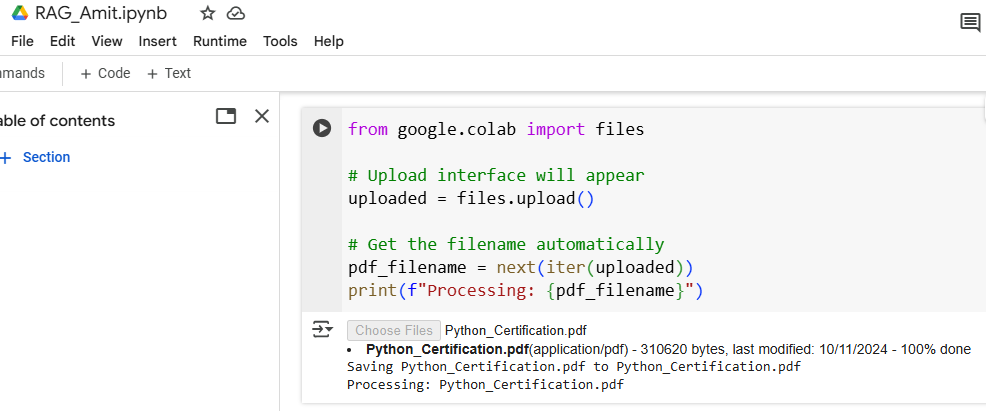
The code snippet below is for Google Colab, allowing users to upload files from their local machine. Using files.upload(), it opens an upload interface and stores the uploaded files in a dictionary-like object called uploaded.
The filename is extracted with next(iter(uploaded)), which retrieves the first key (filename) from the dictionary.
Finally, it prints a confirmation message displaying the filename being processed, enabling further actions on the uploaded file. It’s particularly handy for working with files like PDFs or datasets within the Colab environment.
Here is the code snippet:
from google.colab import files

# Upload interface will appear
uploaded = files.upload()

# Get the filename automatically
pdf_filename = next(iter(uploaded))
print(f"Processing: {pdf_filename}")
Here, we uploaded our PDF:
3. PDF Text Extraction
The below code extracts text from a PDF file using the PyMuPDF library (fitz). The function extract_text_from_pdf() takes the PDF’s file path as input, opens the file, and iterates through its pages to collect text from each page using the get_text() method. All the extracted text is then combined into a single string, with pages separated by spaces.
The function is called with the uploaded PDF file (pdf_filename), and the length of the extracted text in characters is printed to indicate successful extraction. This script is useful for text analysis or data retrieval from PDF documents.
Here is the code snippet:
4. Text Chunking
This code splits a long text into smaller, manageable chunks using the chunk_text() function, which includes an overlap of words between chunks for continuity. The function takes the input text and splits it into words, iterating through them in steps of chunk_size – overlap.
Each chunk contains a specified number of words (chunk_size), ensuring some overlap between consecutive chunks. These chunks are stored in a list and returned. When applied to pdf_text, the code creates text chunks and prints the total number of chunks generated, useful for tasks like text analysis or language processing.
def chunk_text(text, chunk_size=300, overlap=50):
    """Splits text into manageable chunks with overlap"""
    words = text.split()
    chunks = []
    for i in range(0, len(words), chunk_size - overlap):
        chunk = ' '.join(words[i:i + chunk_size])
        chunks.append(chunk)
    return chunks

# Create document chunks
document_chunks = chunk_text(pdf_text)
print(f"Created {len(document_chunks)} text chunks")
5. Embeddings & FAISS Index
The below code uses the SentenceTransformer model to generate vector embeddings for text chunks (document_chunks), enabling semantic understanding and efficient search. The embedding model, all-MiniLM-L6-v2, creates numerical representations of each chunk, which are then stored in a FAISS index. FAISS is an efficient library for similarity search, and here it uses inner product similarity (IndexFlatIP) for comparisons. The code calculates the embedding dimensions (dimension) and adds the embeddings to the index, creating a searchable structure for tasks like document retrieval or semantic similarity analysis.
Here is the code snippet:
from sentence_transformers import SentenceTransformer
import faiss
import numpy as np

# Load lightweight embedding model (works on CPU)
embedding_model = SentenceTransformer('all-MiniLM-L6-v2')

# Generate embeddings for each chunk
chunk_embeddings = embedding_model.encode(document_chunks)

# Create FAISS index for efficient search
dimension = chunk_embeddings.shape[1]
index = faiss.IndexFlatIP(dimension)  # Inner Product similarity
index.add(chunk_embeddings)
6. Question Answering Setup
This code uses the transformers library to create a question-answering pipeline with a lightweight, CPU-friendly model called distilbert-base-case-distilled-squad. The pipeline is designed to take a question and context as input and provide the best answer based on the context. By specifying the model and tokenizer, the code ensures efficient processing on devices without GPUs. This setup is ideal for extracting precise answers from given text or documents using natural language understanding.
Here is the code snippet:
from transformers import pipeline

# Load a CPU-efficient QA model
qa_pipeline = pipeline(
    "question-answering",
    model="distilbert-base-cased-distilled-squad",
    tokenizer="distilbert-base-cased-distilled-squad"
)
7. Complete RAG Pipeline
This code defines a rag_pipeline() function that combines retrieval and answer generation for a given query. First, it encodes the query into an embedding using the embedding_model and searches the FAISS index to find k relevant text chunks (document_chunks) based on semantic similarity. These retrieved chunks are joined to form a context for answering the query. Then, the context and query are passed to the qa_pipeline, which generates an answer using a question-answering model.
The function also displays the retrieved context snippets and the generated answer, providing clear insights into the process. This setup is valuable for tasks like document-based question answering or search engines.
Here is the code snippet:
def rag_pipeline(query, k=3):
    """Retrieves relevant text and generates answers"""

    # Step 1: Retrieve relevant chunks
    query_embedding = embedding_model.encode(query)
    distances, indices = index.search(np.array([query_embedding]), k)
    retrieved_docs = [document_chunks[i] for i in indices[0]]
    context = " ".join(retrieved_docs)

    # Step 2: Generate answer
    result = qa_pipeline(question=query, context=context)

    # Display results
    print("\n🔍 Retrieved Context:")
    for i, doc in enumerate(retrieved_docs):
        print(f"{i+1}. {doc[:150]}...")

    print("\n🤖 Generated Answer:")
    print(result['answer'])

    return result
8. Testing the System
This part of the code demonstrates how to use the RAG system to query your PDF document. The first example asks about the main topics in the document by calling rag_pipeline(query), which retrieves relevant chunks (default: 3) and generates an answer.
The second example requests a summary of key points and increases the retrieved chunks to 5 (k=5) to provide broader context for better summarization. Both queries show the retrieved context snippets followed by a generated answer, making it easy to understand where the response comes from. This is the interactive part where you test the system with your own questions.
Here is the code snippet:
# Example query about your document
query = "What are the main topics discussed in this document?"
rag_pipeline(query)

# Another example
query = "Summarize the key points"
rag_pipeline(query, k=5)  # Use more chunks for summarization
Output
🔍 Retrieved Context:
1. Content 9 MATPLOTLIB - 16 LESSONS Learn Data Visualization with the Matplotlib Python Library 1. Matplotlib - Introduction 2. Install Matplotlib on Wi...
2. Copyright – All Rights Reserved CERTIFIED PYTHON PROGRAM Detailed Course Syllabus Copyright – All Rights Reserved TABLE OF...
3. NumPy array 11. Iterate NumPy Arrays 12. Joining NumPy Arrays 13. Split NumPy Array 14. Search an Array for a value 15. Sorting NumPy Arrays 16. Axes ...

🤖 Generated Answer:
Content 9 MATPLOTLIB - 16

🔍 Retrieved Context:
1. Content 9 MATPLOTLIB - 16 LESSONS Learn Data Visualization with the Matplotlib Python Library 1. Matplotlib - Introduction 2. Install Matplotlib on Wi...
2. Copyright – All Rights Reserved CERTIFIED PYTHON PROGRAM Detailed Course Syllabus Copyright – All Rights Reserved TABLE OF...
3. NumPy array 11. Iterate NumPy Arrays 12. Joining NumPy Arrays 13. Split NumPy Array 14. Search an Array for a value 15. Sorting NumPy Arrays 16. Axes ...
4. Content 9 MATPLOTLIB - 16 LESSONS Learn Data Visualization with the Matplotlib Python Library 1. Matplotlib - Introduction 2. Install Matplotlib on Wi...
5. Content 9 MATPLOTLIB - 16 LESSONS Learn Data Visualization with the Matplotlib Python Library 1. Matplotlib - Introduction 2. Install Matplotlib on Wi...

🤖 Generated Answer:
10 Certificate of Completion 10
{'score': 0.052490103989839554,
 'start': 1518,
 'end': 1549,
 'answer': '10 Certificate of Completion 10'}
Key features of this implementation
- CPU-Compatible: Uses models that work well without GPU
- Efficient Retrieval: FAISS for fast similarity search
- Modular Design: Easy to replace components
- Memory Efficient: Processes documents in chunks
- Interactive: Clear output formatting
Troubleshooting Tips
If you encounter issues:
- Restart the runtime if you change GPU/CPU settings
- Reduce chunk size if memory errors occur
- Try smaller models if performance is slow:
'multi-qa-MiniLM-L6-cos-v1'for embeddings'bert-large-uncased-whole-word-masking-finetuned-squad'for QA
This implementation provides a complete, working RAG system that you can use with any PDF document in Google Colab without GPU requirements.
If you liked the tutorial, spread the word and share the link and our website Studyopedia with others.
For Videos, Join Our YouTube Channel: Join Now
Read More:
- What is Machine Learning
- What is a Machine Learning Model
- Types of Machine Learning
- Supervised vs Unsupervised vs Reinforcement Machine Learning
- What is Deep Learning
- Feedforward Neural Networks (FNN)
- Convolutional Neural Network (CNN)
- Recurrent Neural Networks (RNN)
- Long short-term memory (LSTM)
- Generative Adversarial Networks (GANs)
No Comments