08 Jan What is a Webhook Node in n8n
The Webhook node is your workflow’s entry point for external events. The Webhook Node is n8n’s primary tool for receiving real-time data from external apps and services. It acts as a bridge or a custom API endpoint for your workflows. When another service (like GitHub, Stripe, or a form on your website) sends an HTTP request to this endpoint, it automatically triggers your n8n workflow, passing along the data. Let us understand it more:
- First and foremost, it is a trigger node. This means it’s designed to be the starting point of a workflow. Unlike other nodes that process data after something happens, the Webhook Node sits idle until it receives an external call—then it springs the entire workflow into action.
- In n8n, the Webhook node is a trigger node that lets external apps or services send data into your workflow in real time. It listens for incoming HTTP requests at a unique URL and can start a workflow instantly when an event occurs, making it ideal for building custom API endpoints or connecting services that don’t have native integrations.
Key Features of the Webhook Node
- Trigger Workflows: It starts workflows when an external service sends data to the webhook URL.
- Custom Endpoints: Acts like an API endpoint, allowing you to process incoming data and return results.
- Flexible URLs: Provides separate test and production webhook URLs for safe development and deployment.
- Return Data: Can send back processed results at the end of a workflow, useful for integrations like form submissions or API calls.
- Universal Integration: Enables connections with services that don’t have a dedicated n8n node by simply sending an HTTP request.
How It Works
- Create a Webhook Node in your workflow.
- Copy the Webhook URL generated by n8n (test or production).
- Configure the external service (e.g., Stripe, Slack, GitHub) to send events/data to that URL.
- Workflow Execution: When the event occurs, the webhook receives the payload and triggers the workflow.
- Optional Response: The workflow can process the data and send a response back to the caller.
Example Use Cases
- Form Submissions: Capture data from a website form and store it in a database.
- Payment Events: Trigger workflows when a payment succeeds in Stripe or PayPal.
- Chat Integrations: Receive Slack or Telegram messages and automate responses.
- Custom APIs: Build lightweight APIs that process requests and return structured results.
Best Practices
- Security: Always validate incoming data and consider authentication (e.g., secret tokens).
- Testing vs. Production: Use the test URL during development; switch to production for live workflows.
- Scalability: Webhooks are real-time, so ensure your workflow can handle bursts of traffic.
- Error Handling: Implement fallback logic in case the external service retries failed requests.
Example workflow in n8n using the Webhook node
Let’s walk through a step‑by‑step example workflow in n8n using the Webhook node so you can see how it works in practice. I’ll use a simple but powerful scenario: capturing website form submissions and storing them in Google Sheets.
Example Workflow: Contact Form → Webhook → Google Sheets
1. Add a Webhook Node
- Drag a Webhook node into your workflow.
- Configure it:
- HTTP Method:
POST(since forms usually send data via POST). - Path: e.g.,
/contact-form. - This generates a Webhook URL like:
https://your-n8n-instance/webhook-test/contact-form
- HTTP Method:
2. Connect Your Website Form
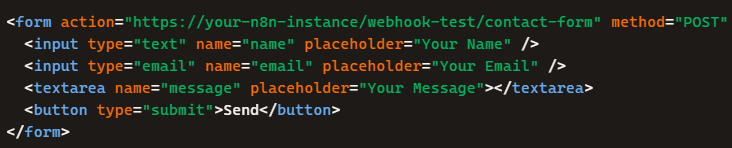
-
- In your HTML form, set the
actionattribute to the webhook URL. - Example:
- In your HTML form, set the
Test the Webhook
- Submit the form.
- The Webhook node will capture the payload (name, email, message).
- You can inspect the data in n8n’s Execution view.
4. Add a Google Sheets Node
- Connect the Webhook node to a Google Sheets node.
- Configure it to append a new row with the captured data:
- Column A → Name
- Column B → Email
- Column C → Message
5. (Optional) Send a Response
- The Webhook node can also return a response to the browser.
- Example: “Thank you for your message, we’ll get back to you soon!”
Workflow Flow
- User submits form →
- Webhook node receives data →
- Google Sheets node saves it →
- Webhook responds with confirmation.
If you liked the tutorial, spread the word and share the link and our website, Studyopedia, with others.
For Videos, Join Our YouTube Channel: Join Now
Read More:
No Comments