06 Oct Convolutional Neural Networks (CNN)
The Convolutional Neural Network (CNN) is a Deep Learning model mostly used to recognize patterns, shapes, and objects within images. CNN was designed mainly to analyze visual data. It is widely used for image recognition, object detection, and image segmentation because it automatically learns features from the images.
CNNs have layers to perform convolution, pooling, and fully connected operations. CNN mainly includes the Convolution and Pooling layers. The convolution layers use a series of filters to extract features, whereas the pooling layers use some techniques like max pooling and average pooling to downsample the data. This also reduces computational complexity.
Process of Convolutional Neural Networks
The following is the CNN process:
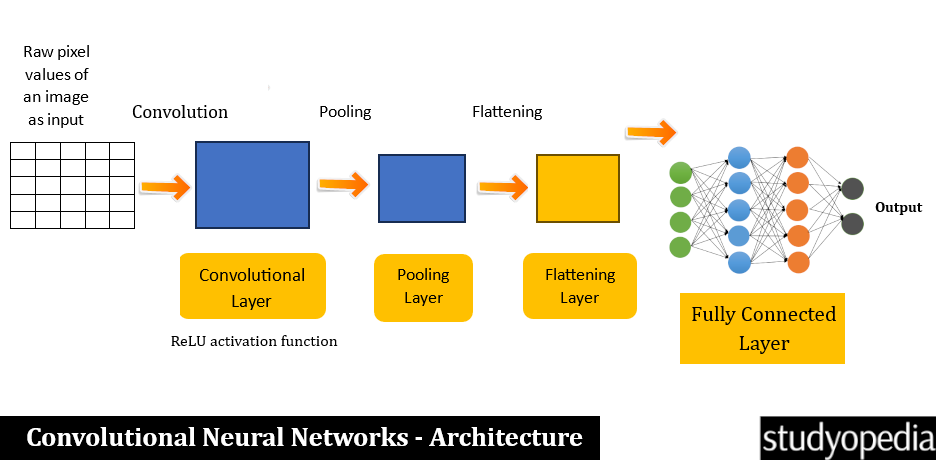
- Step 1: The image is our input. The raw pixel values of the image are the input to the network.
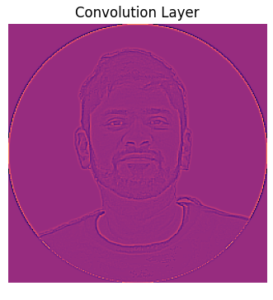
- Step 2: The input is applied with a filter (or kernels). This produces feature maps that assist in detecting the edges, patterns, textures, etc. This is the Convolutional Layer.
- Step 3: Under this step, the spatial dimensions of the feature maps are reduced. This retains the key information and reduces computational complexity. Some of the well-known methods for this are max pooling and average pooling. This is the Pooling Layer.
- Step 4: The reduced feature image from the previous step is converted into a single vector. This is done to feed into the fully connected layer. This is the Flattening Layer.
- Step 5: The flattened vector is fed as input to the Fully Connected layer to classify the image. It is processed through a series of nodes and the extracted features are combined. This is done to make the final prediction. This is the Fully Connected Layer.
- Step 6: The output produces the final classification or prediction. This is mostly done using a Softmax activation function for multi-class classification tasks. This is the output layer.
Architecture of Convolutional Neural Networks (CNN)
Based on what we learned above, let us now see the architecture of Convolutional Neural Networks:
Applications of Convolutional Neural Networks (CNN)
The following are the real-life applications of Convolutional Neural Networks:
- Image and Video Recognition: Tagged images on social media, such as Facebook. Also, the facial recognition feature in a mobile phone unlocks it.
- Medical Image Analysis: CNN has its application in the healthcare sector as well to detect cancerous tumors, and diagnose diseases from X-rays, MRIs, CT scans, etc.
- Self-driving cars: CNN applications can also be seen in autonomous vehicles to recognize objects, such as other vehicles, trees, pedestrians, animals, traffic signs, etc.
Advantages of Convolutional Neural Networks (CNN)
The following are the advantages of Convolutional Neural Networks:
- Achieves higher accuracy in image recognition and object detection
- Easily handles large amounts of data
- Manual feature extraction is not required.
- The convolution operation is computationally efficient
Disadvantages of Convolutional Neural Networks (CNN)
The following are the advantages of Convolutional Neural Networks:
- Expensive to train
- The training requires a lot of memory
- For training, CNN requires a large amount of labeled data.
- It can lead to overfitting if regularization techniques are not used
Example of Convolutional Neural Networks (CNN)
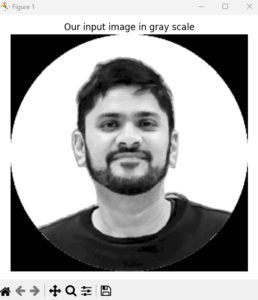
Here, we have applied CNN on the following image amit.jpg:

The below example shows different layers in the CNN architecture as well. We have used the ReLU function as well. The input image is displayed after each layer beginning with grayscale, then convolution, activation, and then pooling. Here are the steps we followed:
- Define the kernel
- Load the image
- Plot the image
- Set the image as a NumPy array
- setup to display the image in grayscale
- Reformat the image and convert it to float32
- Convolutional Layer
- The Activation layer to assign TensorFlow’s ReLU activation function.
- Pooling layer for downsampling an input
- Apply max pooling
- Display the pooled image with enhanced edge detection and max pooling filter
Let us see the steps in detail:
Step 1: Import the libraries
|
1 2 3 4 5 |
import tensorflow as tf import matplotlib.pyplot as plt import numpy as np |
Step 2: Set the parameters
The param is set below. The autolayout automatically adjusts the layout of figures for better fitting, ensuring that your plots don’t overlap:
|
1 2 3 |
plt.rc('figure', autolayout=True) |
Step 3: Change the default colormap for the images
Change the default colormap for images to ‘magma‘, which is a perceptually uniform colormap great for data visualization:
|
1 2 3 |
plt.rc('image', cmap='magma') |
Step 4: Set a convolution filter (define a kernel)
Define the kernel. Set up a convolutional filter in TensorFlow! A convolutional filter is a kernel. This kernel is often used for edge detection in images.
When this kernel is applied to an image, it highlights regions where there is a rapid change in intensity, helping to detect edges:
|
1 2 3 4 5 6 |
kernel = tf.constant([[-1, -1, -1], [-1, 8, -1], [-1, -1, -1], ]) |
Step 5: Load the image
Load and read the image amit.jpg. Read and preprocess an image named amit.jpg using TensorFlow. Resize the image to [250, 250] for our neural network with the resize().
|
1 2 3 4 5 |
image = tf.io.read_file('amit.jpg') image = tf.io.decode_jpeg(image, channels=1) image = tf.image.resize(image, size=[250, 250]) |
Step 6: Plot the image
The image is plotted. We are removing the dimensions of size 1 from the shape of the image tensor, making it easier to handle. We have our image as a NumPy array now:
|
1 2 3 |
img = tf.squeeze(image).numpy() |
The image is now set to display in grayscale image
|
1 2 3 4 |
plt.figure(figsize=(5, 5)) plt.imshow(img, cmap='gray') |
The axis is turned off to give our image a cleaner look without the distracting axis lines:
|
1 2 3 4 5 |
plt.axis('off') plt.title('Our input image in gray scale') plt.show() |
Step 7: Convert the image
Convert the image to float32 and expand its dimensions to match the expected input format for convolution
|
1 2 3 4 5 |
image = tf.image.convert_image_dtype(image, dtype=tf.float32) image = tf.expand_dims(image, axis=0) |
Reshaping and casting the kernel to the proper type and shape prepares it perfectly for applying the convolution operation:
|
1 2 3 4 5 |
kernel = tf.reshape(kernel, [*kernel.shape, 1, 1]) kernel = tf.cast(kernel, dtype=tf.float32) |
Step 8: Convolution layer
Prepare to use TensorFlow’s built-in function for performing 2D convolutions. This will enable applying your edge detection kernel to your image efficiently:
|
1 2 3 |
conv_fn = tf.nn.conv2d |
With conv_fn applied, the image filtered through the edge detection kernel
|
1 2 3 4 5 6 7 8 9 10 11 12 13 |
image_filter = conv_fn( input=image, filters=kernel, strides=1, padding='SAME', ) |
Step 9: Plot the convolved image
First, expand the canvas
|
1 2 3 |
plt.figure(figsize=(10, 5)) |
Now, plot the convolved image
|
1 2 3 |
plt.subplot(1, 3, 1) |
Step 10: Display the filtered image
Display the filtered image without the axis. With the wider figure size, the detected edges will be clearly visible
|
1 2 3 4 5 6 7 8 9 10 11 |
plt.imshow( tf.squeeze(image_filter) ) plt.axis('off') plt.title('Convolution Layer') |
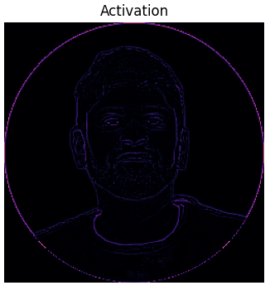
Step 11: Assign TensorFlow’s ReLU activation function
This is the Activation layer. This assigns TensorFlow’s ReLU activation function. ReLU (Rectified Linear Unit) is a popular activation function
This ReLu introduces non-linearity to the model, helping it learn complex patterns
|
1 2 3 |
relu_fn = tf.nn.relu |
Step 12: Image Detection
Apply the ReLU function to the filtered image, emphasizing those sharp edges
|
1 2 3 |
image_detect = relu_fn(image_filter) |
Step 13: Display the edge-detected image
Create the second subplot in a 1×3 grid. Display multiple plots side by side:
|
1 2 3 |
plt.subplot(1, 3, 2) |
The edge-detected image will now be visible clearly post-ReLU activation:
|
1 2 3 4 5 6 7 8 9 10 11 12 13 |
plt.imshow( # We are reformatting for plotting tf.squeeze(image_detect) ) plt.axis('off') plt.title('Activation') |
Step 14: Pooling Layer
The following is the Pooling layer. This is for downsampling an input. It combines values over a sliding window to reduce the spatial dimensions.
Popular choices are max pooling (taking the max value in each window) and average pooling (taking the average value in each window):
|
1 2 3 |
pool = tf.nn.pool |
We are applying max pooling to your edge-detected image. This downsamples the image while retaining the strongest features:
|
1 2 3 4 5 6 7 8 9 10 11 12 13 |
image_condense = pool(input=image_detect, window_shape=(2, 2), pooling_type='MAX', strides=(2, 2), padding='SAME', ) |
Create the third subplot. Display multiple plots side by side:
|
1 2 3 |
plt.subplot(1, 3, 3) |
Step 15: The pooled image
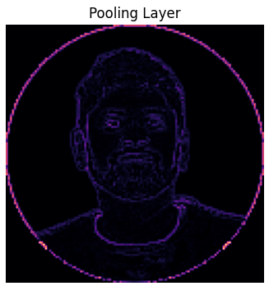
Display the pooled image with enhanced edge detection and max pooling filter:
|
1 2 3 4 5 6 7 8 9 |
plt.imshow(tf.squeeze(image_condense)) plt.axis('off') plt.title('Pooling Layer') plt.show() |
Output
The following is the output displaying the grayscale image:
After that, the images from various layers are visible. The convolution layer is displayed below:
The activation:
The pooling is shown below:
If you liked the tutorial, spread the word and share the link and our website Studyopedia with others.
For Videos, Join Our YouTube Channel: Join Now
Read More:
No Comments